- Start the next iteration
- Update the DG with design details IMPORTANT
- Smoke-test CATcher IMPORTANT counted for participation
- Ensure the code RepoSense-compatible
Guidance for the item(s) below:
Some things to note as you start the v2.0 iteration:
- Set moderate targets for functionality. Adding more functionality than needed will not earn you more marks but can expose you to higher risk of bugs.
Focus on improving the process and the quality instead. - Move in small steps, and keep the product working at each step. If it breaks, you will only have to examine the latest change for the cause of the breakage.
1 Start the next iteration
The version you deliver in this iteration (i.e., v2.0) will be subjected a peer testing (aka PE Dry Run) and you will be informed of the bugs they find (no penalty for those bugs). Hence, it is in your interest to finish implementing all your features you want to include in your final version (i.e., v2.1)final features in this iteration itself so that you can get them tested for free. You can use the final iteration for fixing the bugs found by peer testers.
Furthermore, the final iteration (i.e., the one after this) will be shorter than usual and there'll be a lot of additional things to do during that iteration e.g., polishing up documentation; all the more reason to try and get all the implementation work done in this iteration itself.
As you did in the previous iteration,
- Plan the next iteration (steps are given below as a reminder):
- Decide which enhancements will be added to the product in this iteration, if this is the last iteration.
- If possible, split that into two incremental versions.
- Divide the work among team members.
- Reflect the above plan in the issue tracker.
- Start implementing the features as per the plan made above.
- Track the progress using GitHub issue tracker, milestones, labels, etc.
In addition,
- Maintain the defensiveness of the code: Remember to use assertions, exceptions, and logging in your code, as well as other defensive programming measures when appropriate.
Remember to enable assertions in your IDEA run configurations and in the gradle file. - Recommend: Each PR should also update the relevant parts of documentation and tests. That way, your documentation/testing work will not pile up towards the end.
2 Update the DG with design details IMPORTANT
- Update the Developer Guide as follows:
- Each member should describe the implementation of at least one enhancement she has added (or planning to add).
Expected length: 1+ page per person - Describing the design at a multiple-levels (e.g., first, describe at architecture-level, then describe at component-level) is optional. It is also acceptable to have one Design & Implementation section in which you describe the entire thing at the class- and object-level.
- The description can contain things such as,
- How the feature is implemented (or is going to be implemented).
- Why it is implemented that way.
- Alternatives considered.
- Each member should describe the implementation of at least one enhancement she has added (or planning to add).
Admin tP Deliverables → DG → Tips
- Aim to showcase your documentation skills. The stated objective of the DG is to explain the implementation to a future developer, but a secondary objective is to serve as evidence of your ability to document deeply-technical content using prose, examples, diagrams, code snippets, etc. appropriately. To that end, you may also describe features that you plan to implement in the future, even beyond v2.1 (hypothetically).
For an example, see the description of the undo/redo feature implementation in the AddressBook-Level3 developer guide. - Diagramming tools:
-
AB3 uses PlantUML (see the guide Using PlantUML @SE-EDU/guides for more info).
-
You may use any other tool too (e.g., PowerPoint). But if you do, note the following:
Choose a diagramming tool that has some 'source' format that can be version-controlled using git and updated incrementally (reason: because diagrams need to evolve with the code that is already being version controlled using git). For example, if you use PowerPoint to draw diagrams, also commit the source PowerPoint files so that they can be reused when updating diagrams later. -
Can i.e., automatically reverse engineered from the Java codeIDE-generated UML diagrams be used in project submissions? Not a good idea. Given are three reasons each of which can be reported by evaluators as 'bugs' in your diagrams, costing you marks:
- They often don't follow the standard UML notation (e.g., they add extra icons).
- They tend to include every little detail whereas we want to limit UML diagrams to important details only, to improve readability.
- Diagrams reverse-engineered by an IDE might not represent the actual design as some design concepts cannot be deterministically identified from the code. e.g., differentiating between multiplicities
0..1vs1, composition vs aggregation
-
- Use multiple UML diagram types. Following from the point above, try to include UML diagrams of multiple types to showcase your ability to use different UML diagrams.
- Keep diagrams simple. The aim is to make diagrams comprehensible, not necessarily comprehensive.
Ways to simplify diagrams:- Omit less important details. Examples:
- a class diagram can omit minor utility classes, private/unimportant members; some less-important associations can be shown as attributes instead.
- a sequence diagram can omit less important interactions, self-calls.
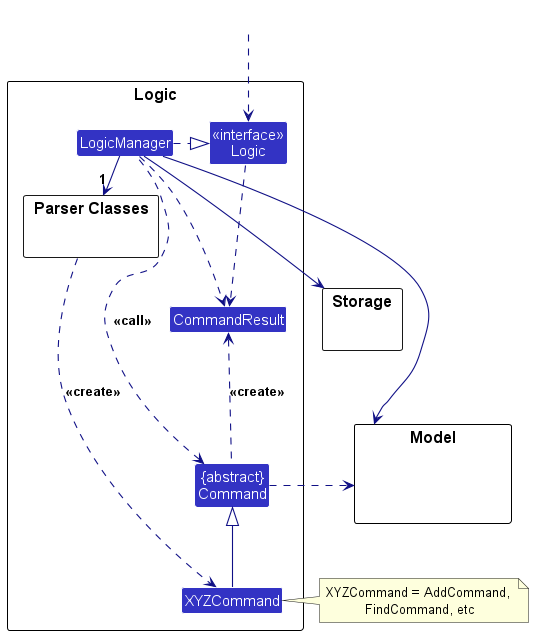
- Omit repetitive details e.g., a class diagram can show only a few representative ones in place of many similar classes (note how the AB3 Logic class diagram shows concrete
*Commandclasses using a placeholderXYZCommand). - Limit the scope of a diagram. Decide the purpose of the diagram (i.e., what does it help to explain?) and omit details not related to it.
- Break diagrams into smaller fragments when possible.
- If a component has a lot of classes, consider further dividing into sub-components (e.g., a Parser sub-component inside the Logic component). After that, sub-components can be shown as black-boxes in the main diagram and their details can be shown as separate diagrams.
- You can use
refframes to break sequence diagrams to multiple diagrams.
- Use visual representations as much as possible. E.g., show associations and navigabilities using lines and arrows connecting classes, rather than adding a variable in one of the classes.
- For some more examples of what NOT to do, see here.
- Omit less important details. Examples:
- Integrate diagrams into the description. Place the diagram close to where it is being described.
- Use code snippets sparingly. The more you use code snippets in the DG, and longer the code snippet, the higher the risk of it getting outdated quickly. Instead, use code snippets only when necessary and cite only the strictly relevant parts only. You can also use pseudo code instead of actual programming code.
- Resize diagrams so that the text size in the diagram matches the the text size of the main text of the diagram. See example.
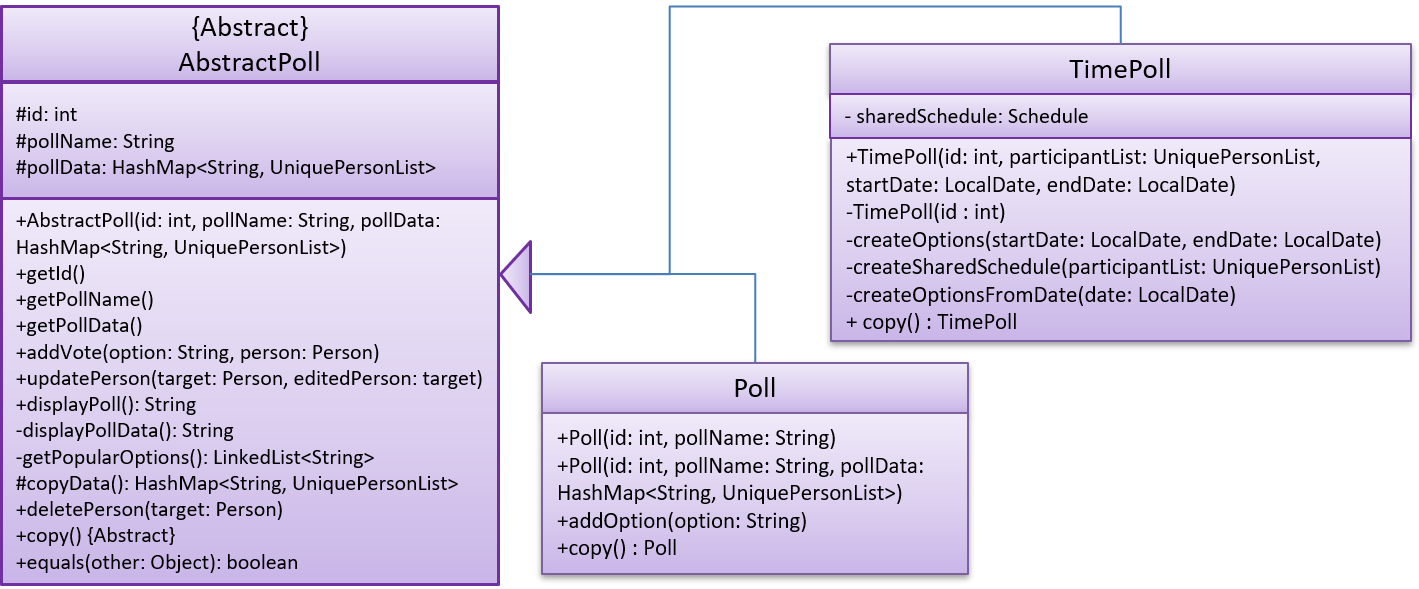
These class diagrams seem to have lot of member details, which can get outdated pretty quickly:
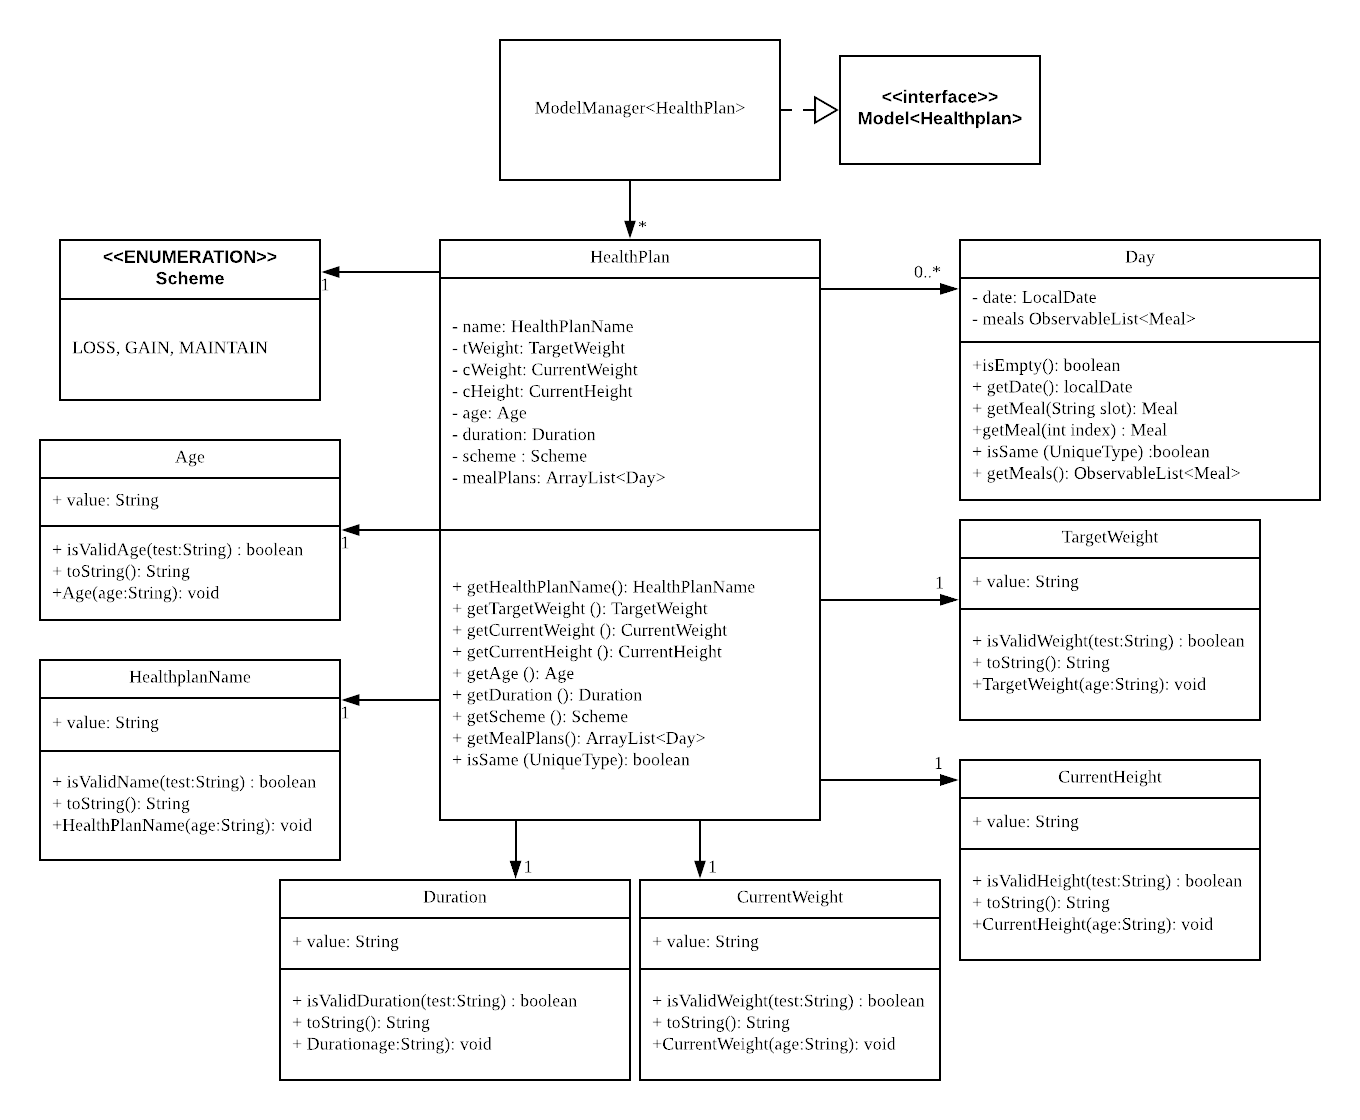
This class diagram seems to have too many classes:

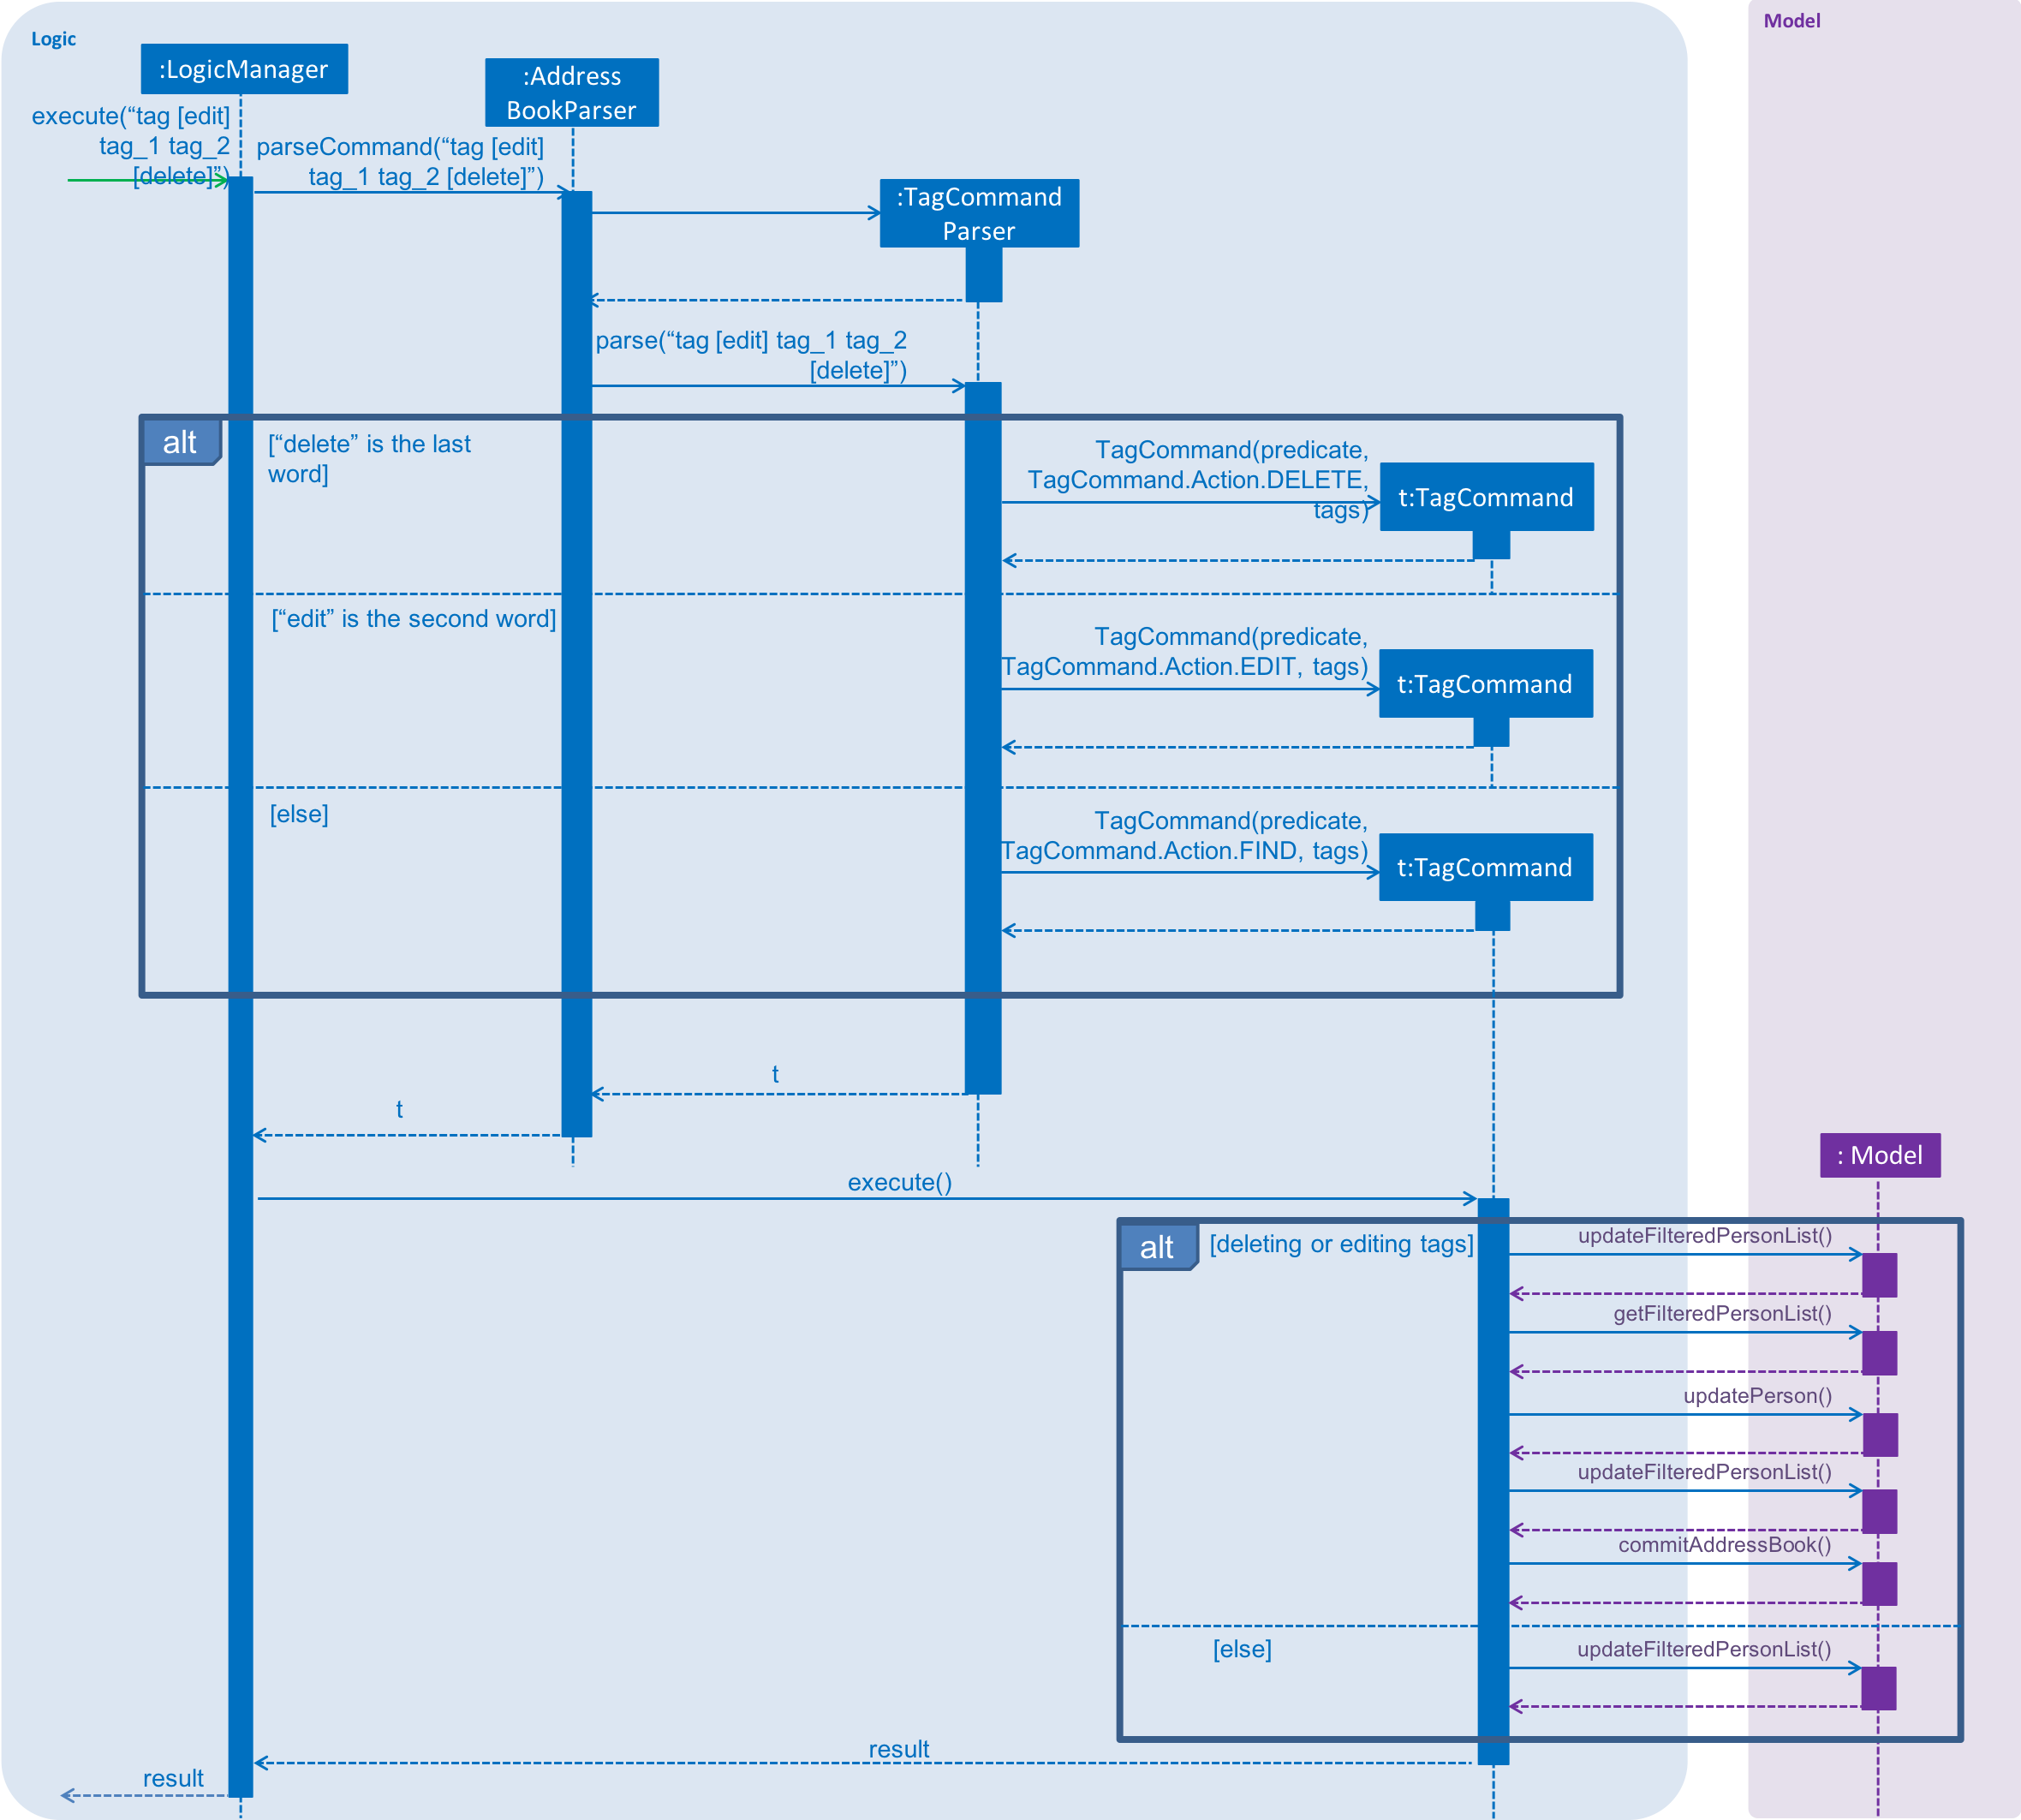
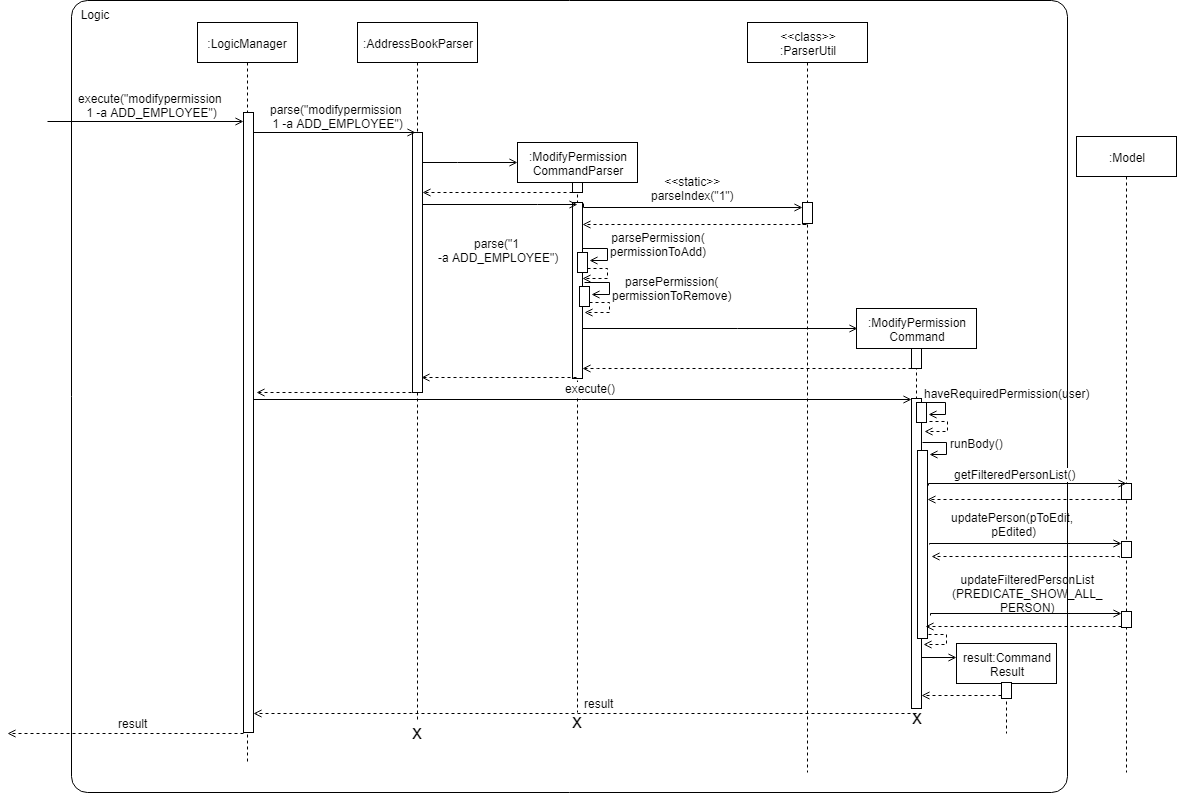
These sequence diagrams are bordering on 'too complicated':
In this negative example, the text size in the diagram is much bigger than the text size used by the document:
It will look more 'polished' if the two text sizes match.
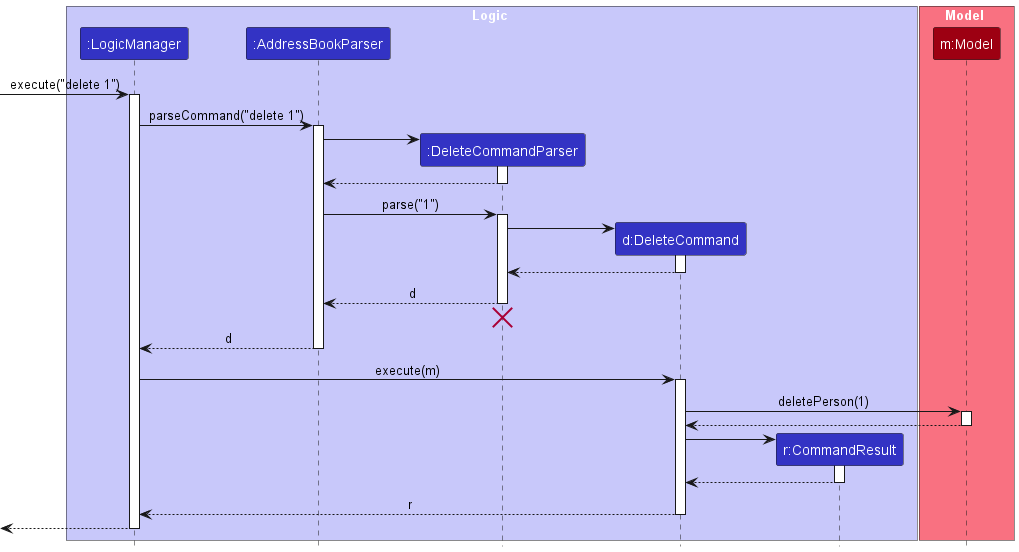
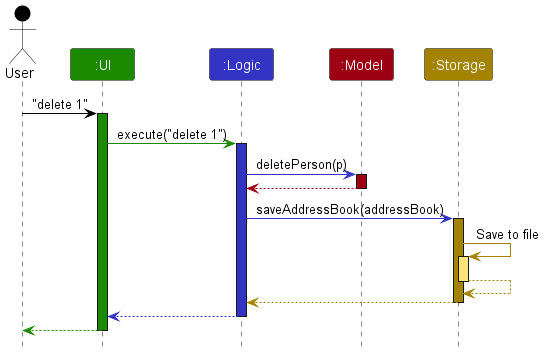
delete command
3 Smoke-test CATcher IMPORTANT counted for participation
- This activity is compulsory and counts for
3participation points. Please do it before the deadline.
Some background: As you know, our i.e., Practical ExamPE includes peer-testing tP products under exam conditions. In the past, we used GitHub as the platform for that -- which was not optimal (e.g., it was hard to ensure the compulsory labels have been applied). As a remedy, some ex-students have been developing an app called CAT stands for Crowd-sourced Anonymous TestingCATcher that we'll be using for the PE this semester.
This week, we would like you to smoke-test the CATcher app to ensure it can run in your computer.
The steps for smoke-testing CATcher:
- Download the latest version of the CATcher executable from https://github.com/CATcher-org/CATcher/releases.
- Launch the app. Allow the app to run if there are security warnings (e.g., for Win 10, click the
More Infolink in the security warning and chooseRun anyway).
If the app is blocked by your virus scanner, put it in a new folder and add the folder to the exclusions list of the virus scanner.
If you encounter other problems at the app launch, refer to the Notes on using the CATcher Desktop App. - Login: Choose the session
CS2113/T Alpha Test, and submit.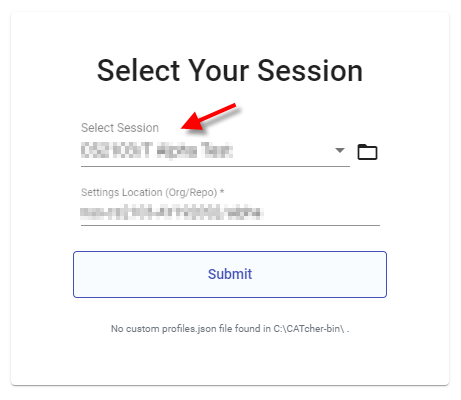
- In the next screen, login to CATcher using your GitHub account.
If the app asks for public repo access permissions, grant it (just go with the default settings). - Let CATcher create a repo named
alphain your GitHub account, when it asks for permission. That repo will be used to hold the bug reports you will create in this testing session. - Use the app (not the GitHub Web interface) to create 1-2 dummy bug reports. The steps are similar to how you would enter bug reports in the GitHub issue tracker. Include at least one screenshot in one of those bug reports.
you can copy-paste screenshots into the bug description.
You can use Markdown syntax in the bug descriptions.
Theseverityandtypelabels are compulsory. - Report any problems you encounter at the CATcher issue tracker.
- Do NOT delete the
alpharepo created by CATcher in your GitHub account (keep it until the end of the semester) as our scripts will look for it later to check if you have done this activity. - Do NOT delete the CATcher executable you downloaded either; you will need it again.
4 Ensure the code RepoSense-compatible
-
Ensure your code is i.e., RepoSense can detect your code as yoursRepoSense-compatible and the code it attributes to you is indeed the code written by you, as explained below:
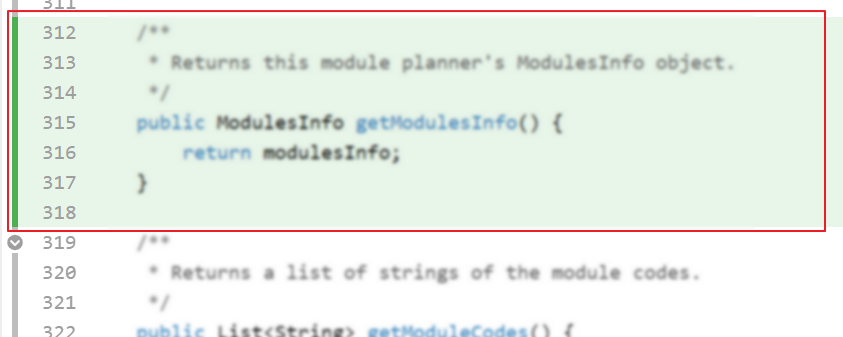
- Go to the tp Code Dashboard. Click on the
</>icon against your name and verify that the lines attributed to you (i.e., lines marked as green) reflects your code contribution correctly. This is important because some aspects of your project grade (e.g., code quality) will be graded based on those lines.
- More info on how to make the code RepoSense compatible:
- Go to the tp Code Dashboard. Click on the
Admin Tools → RepoSense
Tool: RepoSense (for authorship tracking)
We will be using a tool called RepoSense to make it easier for you to see (and learn from) code written by others, and to help us see who wrote which part of the code.
Viewing the current status of code authorship data:
- The reports generated by the tool for the individual and team projects will be made available in the module website at some point in the semester. The feature that is most relevant to you is the Code Panel (shown on the right side of the screenshot above). It shows the code attributed to a given author.
- Click on your name to load the code attributed to you (based on Git blame/log data) onto the code panel on the right.
- If the code shown roughly matches the code you wrote, all is fine and there is nothing for you to do.
If the code does not match the actual authorship: Given below are the possible reasons for the code shown to mismatch the code you wrote.
-
Reason 1: the
Author nameof some of your commits is not known to RepoSense -- this is a result of not setting thegit.usernameproperty as instructed in our Git setup instructions.
How to check: Find theAuthor nameof your commits that are missing (you can use SourceTree or thegit logcommand for that -- it's not possible to do that using the GitHub interface though).
Check if that author name is included in the RepoSense config for the iP or the RepoSense config for the tP (whichever the applicable one)
Remedy: Send the missing author name(s) to the prof so that the RepoSense configuration can be updated accordingly. -
Reason 2: The actual authorship does not match the authorship determined by git blame/log e.g., another student touched your code after you wrote it, and Git log attributed the code to that student instead.
Remedy: You can add@@authorannotations as explained in the panel below:
Adding @@author tags to indicate authorship
Adding @@author tags indicate authorship
-
Mark your code with a
//@@author {yourGithubUsername}. Note the double@.
The//@@authortag should indicates the beginning of the code you wrote. The code up to the next//@@authortag or the end of the file (whichever comes first) will be considered as was written by that author. Here is a sample code file://@@author johndoe
method 1 ...
method 2 ...
//@@author sarahkhoo
method 3 ...
//@@author johndoe
method 4 ... -
If you don't know who wrote the code segment below yours, you may put an empty
//@@author(i.e. no GitHub username) to indicate the end of the code segment you wrote. The author of code below yours can add the GitHub username to the empty tag later. Here is a sample code with an emptyauthortag:method 0 ...
//@@author johndoe
method 1 ...
method 2 ...
//@@author
method 3 ...
method 4 ... -
The author tag syntax varies based on file type e.g. for java, css, fxml. Use the corresponding comment syntax for non-Java files.
Here is an example code from an xml/fxml file.<!-- @@author sereneWong -->
<textbox>
<label>...</label>
<input>...</input>
</textbox>
... -
Do not put the
//@@authorinside java header comments.
👎/**
* Returns true if ...
* @@author johndoe
*/👍
//@@author johndoe
/**
  * Returns true if ...
  */
What to and what not to annotate
-
Annotate both functional and test code There is no need to annotate documentation files.
-
Annotate only significant size code blocks that can be reviewed on its own e.g., a class, a sequence of methods, a method.
Claiming credit for code blocks smaller than a method is discouraged but allowed. If you do, do it sparingly and only claim meaningful blocks of code such as a block of statements, a loop, or an if-else statement.- If an enhancement required you to do tiny changes in many places, there is no need to annotate all those tiny changes; you can describe those changes in the Project Portfolio page instead.
- If a code block was touched by more than one person, either let the person who wrote most of it (e.g. more than 80%) take credit for the entire block, or leave it as 'unclaimed' (i.e., no author tags).
- Related to the above point, if you claim a code block as your own, more than 80% of the code in that block should have been written by yourself. For example, no more than 20% of it can be code you reused from somewhere.
- GitHub has a blame feature and a history feature that can help you determine who wrote a piece of code.
-
Do not try to boost the quantity of your contribution using unethical means such as duplicating the same code in multiple places. In particular, do not copy-paste test cases to create redundant tests. Even repetitive code blocks within test methods should be extracted out as utility methods to reduce code duplication. Individual members are responsible for making sure code attributed to them are correct. If you notice a team member claiming credit for code that he/she did not write or use other questionable tactics, you can email us (after the final submission) to let us know.
-
If you wrote a significant amount of code that was not used in the final product,
- Create a folder called
{project root}/unused - Move unused files (or copies of files containing unused code) to that folder
- use
//@@author {yourGithubUsername}-unusedto mark unused code in those files (note the suffixunused) e.g.
//@@author johndoe-unused
method 1 ...
method 2 ...
Please put a comment in the code to explain why it was not used.
- Create a folder called
-
If you reused code from elsewhere, mark such code as
//@@author {yourGithubUsername}-reused(note the suffixreused) e.g.//@@author johndoe-reused
method 1 ...
method 2 ... -
You can use empty
@@authortags to mark code as not yours when RepoSense attribute the code to you incorrectly.-
Code generated by the IDE/framework, should not be annotated as your own.
-
Code you modified in minor ways e.g. adding a parameter. These should not be claimed as yours but you can mention these additional contributions in the Project Portfolio page if you want to claim credit for them.
-
- Reason 3: Some commits should not be included in the authorship analysis e.g., you committed the code of a third party library by mistake.
Remedy: Let us know the hashes of the commits that need to be omitted from the analysis.
If none of the above works, please please post in the forum or contact us via cs2113@comp.nus.edu.sg so that we can advise you what to do.
We recommend you ensure your code is RepoSense-compatible by v2.0