This site is from a past semester! The current version will be here when the new semester starts.
CS2113/T 2020 Aug-Dec
  • Full Timeline
  • Week 1 [Mon, Aug 10th]
  • Week 2 [Fri, Aug 14th]
  • Week 3 [Fri, Aug 21st]
  • Week 4 [Fri, Aug 28th]
  • Week 5 [Fri, Sep 4th]
  • Week 6 [Fri, Sep 11th]
  • Week 7 [Fri, Sep 18th]
  • Week 8 [Fri, Oct 2nd]
  • Week 9 [Fri, Oct 9th]
  • Week 10 [Fri, Oct 16th]
  • Week 11 [Fri, Oct 23rd]
  • Week 12 [Fri, Oct 30th]
  • Week 13 [Fri, Nov 6th]
  • Textbook
  • Admin Info
  • Report Bugs
  • Forum
  • Gitter (Chat)
  • Instructors
  • Announcements
  • Files
  • Tutorial Schedule
  • repl.it link
  • repl.it link (duplicated)
  • Java Coding Standard
  • Git Conventions
  • Forum Activities Dashboard
  • Participation Dashboard

  •  Individual Project (iP):
  • Individual Project Info
  • iP Upstream Repo
  • iP Code Dashboard
  • iP Progress Dashboard

  •  Team Project (tP):
  • Reference AB3
  • Team Project Info
  • Team List
  • tP Code Dashboard
  • tP Progress Dashboard
  • Week 5 [Fri, Sep 4th] - Topics

    • [W5.1] Java: Casting
    • [W5.1a] C++ to Java → Miscellaneous Topics → Casting
    • [W5.2] OOP + Java: Abstract Classes
    • [W5.2a] Paradigms → OOP → Inheritance → Abstract classes and methods

    • [W5.2b] C++ to Java → Inheritance → Abstract classes and methods

    • [W5.3] OOP + Java: Interfaces
    • [W5.3a] Paradigms → OOP → Inheritance → Interfaces

    • [W5.3b] C++ to Java → Inheritance → Interfaces

    • [W5.4] Java: Packages
    • [W5.4a] C++ to Java → Miscellaneous Topics → Packages
    • [W5.5] Java: Access Modifiers
    • [W5.5a] C++ to Java → Miscellaneous Topics → Access modifiers

    • [W5.6] Error Handling: Exceptions
    • [W5.6a] Implementation → Error Handling → Introduction → What

    • [W5.6b] Implementation → Error Handling → Exceptions → What

    • [W5.6c] Implementation → Error Handling → Exceptions → How

    • [W5.6d] C++ to Java → Exceptions → What are Exceptions?

    • [W5.6e] C++ to Java → Exceptions → How to use Exceptions

    • [W5.6f] Implementation → Error Handling → Exceptions → When

    • [W5.7] Specifying Requirements [quick peek ahead]

       User Stories

    • [W5.7a] Requirements → Specifying Requirements → User Stories → Introduction

    • [W5.7b] Requirements → Specifying Requirements → User Stories → Details

    • [W5.7c] Requirements → Specifying Requirements → User Stories → Usage

       Feature Lists

    • [W5.7d] Requirements → Specifying Requirements → Feature Lists → What

    • [W5.8] RCS: Branching
    • [W5.8a] Project Management → Revision Control → Branching

    • [W5.8b] Tools → Git and GitHub → branch: Doing multiple parallel changes


    Guidance for the item(s) below:

    As you have learned the Java basic topics already, it is time to move to intermediate level topics. This week, we cover several such topics, starting with the one given below.

    [W5.1] Java: Casting

    W5.1a

    C++ to Java → Miscellaneous Topics → Casting

    Can use Java casting

    Casting is the action of converting from one type to another. You can use the (newType) syntax to cast a value to a type named newType.

    When you cast a primitive value to another type, there may be a loss of precision.

    The code below casts a double value to an int value and casts it back to a double. Note the loss of precision.

    double d = 5.3;
    System.out.println("Before casting to an int: " + d);
    int i = (int)d; // cast d to an int
    System.out.println("After casting to an int: " + i);
    d = (double)i; // cast i back to a double
    System.out.println("After casting back a double: " + d);

    Before casting to an int: 5.3
    After casting to an int: 5
    After casting back a double: 5.0

    Downcasting is when you cast an object reference from a superclass to a subclass.

    Assume the following class hierarchy:

    class Animal{
    void speak(){
    System.out.println("I'm an animal");
    }
    }

    class Cat extends Animal{
    @Override
    void speak() {
    System.out.println("I'm a Cat");
    }
    }

    class DomesticCat extends Cat{
    @Override
    void speak() {
    System.out.println("I'm a DomesticCat");
    }
    }

    The foo method below downcasts an Animal object to its subclasses.

    public static void foo(Animal a){
    a.speak();
    Cat c = (Cat)a; // downcast a to a Cat
    c.speak();
    DomesticCat dc = (DomesticCat)a; // downcast a to a DomesticCat
    dc.speak();
    }

    Upcasting is when you cast an object reference from a subclass to a superclass. However, upcasting is done automatically by the compiler even if you do not specify it explicitly.

    This example upcasts a Cat object to its superclass Animal:

    Cat c = new Cat();
    Animal a1 = (Animal)c; //upcasting c to the Animal class
    Animal a2 = c; //upcasting is implicit

    Note that due to polymorphism, the behavior of the object will reflect the actual type of the object irrespective of the type of the variable holding a reference to it.

    The call to the speak() method in the code below always executes the speak() method of the DomesticCat class because the actual type of the object remains DomesticCat although the reference to it is being downcast/upcast to various other types.

    Animal a = new DomesticCat(); //implicit upcast
    a.speak();
    Cat c = (Cat)a; //downcast
    c.speak();
    DomesticCat dc = (DomesticCat)a; //downcast
    dc.speak();

    I'm a DomesticCat
    I'm a DomesticCat
    I'm a DomesticCat

    Casting to an incompatible type can result in a ClassCastException at runtime.

    This code will cause a ClassCastException:

    Object o = new Animal();
    Integer x = (Integer)o;

    Exception in thread "main" java.lang.ClassCastException: misc.casting.Animal cannot be
    cast to java.lang.Integer at misc.casting.CastingExamples.main(CastingExamples.java:14)

    You can use the instanceof operator to check if a cast is safe to perform.

    This code checks if the object a is an instance of the Cat class before casting it to a Cat.

    Cat c;
    if (a instanceof Cat){
    c = (Cat)a;
    }

    Guidance for the item(s) below:

    It is time to move on to some intermediate level OOP concepts. Next, let's learn about abstract classes and how they are implemented in Java.

    [W5.2] OOP + Java: Abstract Classes

    W5.2a

    Paradigms → OOP → Inheritance → Abstract classes and methods

    Can implement abstract classes

    Abstract class: A class declared as an abstract class cannot be instantiated, but it can be subclassed.

    You can declare a class as abstract when a class is merely a representation of commonalities among its subclasses in which case it does not make sense to instantiate objects of that class.

    The Animal class that exists as a generalization of its subclasses Cat, Dog, Horse, Tiger etc. can be declared as abstract because it does not make sense to instantiate an Animal object.

    Abstract method: An abstract method is a method signature without a method implementation.

    The move method of the Animal class is likely to be an abstract method as it is not possible to implement a move method at the Animal class level to fit all subclasses because each animal type can move in a different way.

    A class that has an abstract method becomes an abstract class because the class definition is incomplete (due to the missing method body) and it is not possible to create objects using an incomplete class definition.

    W5.2b

    C++ to Java → Inheritance → Abstract classes and methods

    Can use abstract classes and methods

    In Java, an abstract method is declared with the keyword abstract and given without an implementation. If a class includes abstract methods, then the class itself must be declared abstract.

    The speak method in this Animal class is abstract. Note how the method signature ends with a semicolon and there is no method body. This makes sense as the implementation of the speak method depends on the type of the animal and it is meaningless to provide a common implementation for all animal types.

    public abstract class Animal {

    protected String name;

    public Animal(String name){
    this.name = name;
    }
    public abstract String speak();
    }

    As one method of the class is abstract, the class itself is abstract.

    An abstract class is declared with the keyword abstract. Abstract classes can be used as reference type but cannot be instantiated.

    This Account class has been declared as abstract although it does not have any abstract methods. Attempting to instantiate Account objects will result in a compile error.

    public abstract class Account {

    int number;

    void close(){
    //...
    }
    }

    Account a; OK to use as a type
    a = new Account(); Compile error!

    In Java, even a class that does not have any abstract methods can be declared as an abstract class.

    When an abstract class is subclassed, the subclass should provide implementations for all of the abstract methods in its superclass or else the subclass must also be declared abstract.

    The Feline class below inherits from the abstract class Animal but it does not provide an implementation for the abstract method speak. As a result, the Feline class needs to be abstract too.

    public abstract class Feline extends Animal {
    public Feline(String name) {
    super(name);
    }

    }

    The DomesticCat class inherits the abstract Feline class and provides the implementation for the abstract method speak. As a result, it need not be (but can be) declared as abstract.

    public class DomesticCat extends Feline {
    public DomesticCat(String name) {
    super(name);
    }

    @Override
    public String speak() {
    return "Meow";
    }
    }
    • Animal a = new Feline("Mittens");
      Compile error! Feline is abstract.
    • Animal a = new DomesticCat("Mittens");
      OK. DomesticCat can be instantiated and assigned to a variable of Animal type (the assignment is allowed by polymorphism).

    The Main class below keeps a list of Circle and Rectangle objects and prints the area (as an int value) of each shape when requested.

    public class Main {
    private static Shape[] shapes = new Shape[100];
    private static int shapeCount = 0;

    public static void addShape(Shape s){
    shapes[shapeCount] = s;
    shapeCount++;
    }

    public static void printAreas(){
    for (int i = 0; i < shapeCount; i++){
    shapes[i].print();
    }
    }

    public static void main(String[] args) {
    addShape(new Circle(5));
    addShape(new Rectangle(3, 4));
    addShape(new Circle(10));
    addShape(new Rectangle(4, 4));
    printAreas();
    }
    }

    Circle of area 78
    Rectangle of area 12
    Circle of area 314
    Rectangle of area 16

    Circle class and Rectangle class is given below:

    public class Circle extends Shape {

    private int radius;

    public Circle(int radius) {
    this.radius = radius;
    }

    @Override
    public int area() {
    return (int)(Math.PI * radius * radius);
    }

    @Override
    public void print() {
    System.out.println("Circle of area " + area());
    }
    }
    public class Rectangle extends Shape {
    private int height;
    private int width;

    public Rectangle(int height, int width){
    this.height = height;
    this.width = width;
    }

    @Override
    public int area() {
    return height * width;
    }

    @Override
    public void print() {
    System.out.println("Rectangle of area " + area());
    }
    }

    Add the missing Shape class as an abstract class with two abstract methods.

    public abstract class Shape {

    public abstract int area();
    // ...
    }

    Choose the correct statements about Java abstract classes and classes that are not abstractconcrete classes.

    • a. A concrete class can contain an abstract method.
    • b. An abstract class can contain concrete methods.
    • c. An abstract class need not contain any concrete methods.
    • d. An abstract class cannot be instantiated.

    (b)(c)(d)

    Explanation: A concrete class cannot contain even a single abstract method.

    Guidance for the item(s) below:

    From abstract classes, we move to another related OOP concept interfaces, and how they are implemented in Java.

    [W5.3] OOP + Java: Interfaces

    W5.3a

    Paradigms → OOP → Inheritance → Interfaces

    Can explain interfaces

    An interface is a behavior specification i.e. a collection of Just the method signature without any implementationmethod specifications. If a class implements all methods specified in an interfaceimplements the interface, it means the class is able to support the behaviors specified by the said interface.

    There are a number of situations in software engineering when it is important for disparate groups of programmers to agree to a "contract" that spells out how their software interacts. Each group should be able to write their code without any knowledge of how the other group's code is written. Generally speaking, interfaces are such contracts. --Oracle Docs on Java

    Suppose SalariedStaff is an interface that contains two methods setSalary(int) and getSalary(). AcademicStaff can declare itself as implementing the SalariedStaff interface, which means the AcademicStaff class must implement all the methods specified by the SalariedStaff interface i.e., setSalary(int) and getSalary().

    A class implementing an interface results in an is-a relationship, just like in class inheritance.

    In the example above, AcademicStaff is a SalariedStaff. An AcademicStaff object can be used anywhere a SalariedStaff object is expected e.g. SalariedStaff ss = new AcademicStaff().

    W5.3b

    C++ to Java → Inheritance → Interfaces

    Can use interfaces in Java

    The text given in this section borrows some explanations and code examples from the -- Java Tutorial.

    In Java, an interface is a reference type, similar to a class, mainly containing method signatures. Defining an interface is similar to creating a new class except it uses the keyword interface in place of class.

    Here is an interface named DrivableVehicle that defines methods needed to drive a vehicle.

    public interface DrivableVehicle {
    void turn(Direction direction);
    void changeLanes(Direction direction);
    void signalTurn(Direction direction, boolean signalOn);
    // more method signatures
    }

    Note that the method signatures have no braces ({ }) and are terminated with a semicolon.

    Interfaces cannot be instantiated—they can only be implemented by classes. When an instantiable class implements an interface, indicated by the keyword implements, it provides a method body for each of the methods declared in the interface.

    Here is how a class CarModelX can implement the DrivableVehicle interface.

    public class CarModelX implements DrivableVehicle {

    @Override
    public void turn(Direction direction) {
    // implementation
    }

    // implementation of other methods
    }

    An interface can be used as a type e.g., DrivableVechicle dv = new CarModelX();.

    Interfaces can inherit from other interfaces using the extends keyword, similar to a class inheriting another.

    Here is an interface named SelfDrivableVehicle that inherits the DrivableVehicle interface.

    public interface SelfDrivableVehicle extends DrivableVehicle {
    void goToAutoPilotMode();
    }

    Note that the method signatures have no braces and are terminated with a semicolon.

    Furthermore, Java allows multiple inheritance among interfaces. A Java interface can inherit multiple other interfaces. A Java class can implement multiple interfaces (and inherit from one class).

    The design below is allowed by Java. In case you are not familiar with UML notation used: solid lines indicate normal inheritance; dashed lines indicate interface inheritance; the triangle points to the parent.

    1. Staff interface inherits (note the solid lines) the interfaces TaxPayer and Citizen.
    2. TA class implements both Student interface and the Staff interface.
    3. Because of point 1 above, TA class has to implement all methods in the interfaces TaxPayer and Citizen.
    4. Because of points 1,2,3, a TA is a Staff, is a TaxPayer and is a Citizen.

    Interfaces can also contain constants and static methods.

    C++ to Java → Miscellaneous Topics →

    Constants

    Java does not directly support constants. The convention is to use a static final variable where a constant is needed. The static modifier causes the variable to be available without instantiating an object. The final modifier causes the variable to be unchangeable. Java constants are normally declared in ALL CAPS separated by underscores.

    Here is an example of a constant named MAX_BALANCE which can be accessed as Account.MAX_BALANCE.

    public class Account{

    public static final double MAX_BALANCE = 1000000.0;

    }

    Math.PI is an example constant that comes with Java.

    This example adds a constant MAX_SPEED and a static method isSpeedAllowed to the interface DrivableVehicle.

    public interface DrivableVehicle {

    int MAX_SPEED = 150;

    static boolean isSpeedAllowed(int speed){
    return speed <= MAX_SPEED;
    }

    void turn(Direction direction);
    void changeLanes(Direction direction);
    void signalTurn(Direction direction, boolean signalOn);
    // more method signatures
    }

    Interfaces can contain default method implementations and nested types. They are not covered here.

    The Main class below passes a list of Printable objects (i.e., objects that implement the Printable interface) for another method to be printed.

    public class Main {

    public static void printObjects(Printable[] items) {
    for (Printable p : items) {
    p.print();
    }
    }

    public static void main(String[] args) {
    Printable[] printableItems = new Printable[]{
    new Circle(5),
    new Rectangle(3, 4),
    new Person("James Cook")};

    printObjects(printableItems);
    }
    }

    Circle of area 78
    Rectangle of area 12
    Person of name James Cook

    Classes Shape, Circle, and Rectangle are given below:

    public abstract class Shape {

    public abstract int area();
    }
    public class Circle extends Shape implements Printable {

    private int radius;

    public Circle(int radius) {
    this.radius = radius;
    }

    @Override
    public int area() {
    return (int)(Math.PI * radius * radius);
    }

    @Override
    public void print() {
    System.out.println("Circle of area " + area());
    }
    }
    public class Rectangle extends Shape implements Printable {
    private int height;
    private int width;

    public Rectangle(int height, int width){
    this.height = height;
    this.width = width;
    }

    @Override
    public int area() {
    return height * width;
    }

    @Override
    public void print() {
    System.out.println("Rectangle of area " + area());
    }
    }

    Add the missing Printable interface. Add the missing methods of the Person class given below.

    public class Person implements Printable {

    private String name;

    // todo: add missing methods
    }
    public interface Printable {
    //...
    }

    Guidance for the item(s) below:

    As you add more and more Java classes to your project, keeping all those classes in the same directory becomes untenable. The solution is covered in the next topic.

    [W5.4] Java: Packages

    W5.4a

    C++ to Java → Miscellaneous Topics → Packages

    Can use Java packages

    You can organize your types (i.e., classes, interfaces, enumerations, etc.) into packages for easier management (among other benefits).

    To create a package, you put a package statement at the very top of every source file in that package. The package statement must be the first line in the source file and there can be no more than one package statement in each source file. Furthermore, the package of a type should match the folder path of the source file. Similarly, the compiler will put the .class files in a folder structure that matches the package names.

    The Formatter class below (in <source folder>/seedu/tojava/util/Formatter.java file) is in the package seedu.tojava.util. When it is compiled, the Formatter.class file will be in the location <compiler output folder>/seedu/tojava/util:

    package seedu.tojava.util;

    public class Formatter {
    public static final String PREFIX = ">>";

    public static String format(String s){
    return PREFIX + s;
    }
    }

    Package names are written in all lower case (not camelCase), using the dot as a separator. Packages in the Java language itself begin with java. or javax. Companies use their reversed Internet domain name to begin their package names.

    For example, com.foobar.doohickey.util can be the name of a package created by a company with a domain name foobar.com

    To use a public types contained in the packagepackage member from outside its package, you must do one of the following:

    1. Use the type name prefixed by the package name e.g., java.io.IOExceptionfully qualified name to refer to the member
    2. Import the package or the specific package member

    The Main class below has two import statements:

    • import seedu.tojava.util.StringParser: imports the class StringParser in the seedu.tojava.util package
    • import seedu.tojava.frontend.*: imports all the classes in the seedu.tojava.frontend package
    package seedu.tojava;

    import seedu.tojava.util.StringParser;
    import seedu.tojava.frontend.*;

    public class Main {

    public static void main(String[] args) {

    // Using the fully qualified name to access the Processor class
    String status = seedu.tojava.logic.Processor.getStatus();

    // Using the StringParser previously imported
    StringParser sp = new StringParser();

    // Using classes from the tojava.frontend package
    Ui ui = new Ui();
    Message m = new Message();

    }
    }

    Note how the class can still use the Processor without importing it first, by using its fully qualified name seedu.tojava.logic.Processor

    Importing a package does not import its sub-packages, as packages do not behave as hierarchies despite appearances.

    import seedu.tojava.frontend.* does not import the classes in the sub-package seedu.tojava.frontend.widget.

    If you do not use a package statement, your type doesn't have a package -- a practice not recommended (except for small code examples) as it is not possible for a type in a package to import a type that is not in a package.

    Optionally, a static import can be used to import static members of a type so that the imported members can be used without specifying the type name.

    The class below uses static imports to import the constant PREFIX and the method format() from the seedu.tojava.util.Formatter class.

    import static seedu.tojava.util.Formatter.PREFIX;
    import static seedu.tojava.util.Formatter.format;

    public class Main {

    public static void main(String[] args) {

    String formatted = format("Hello");
    boolean isFormatted = formatted.startsWith(PREFIX);
    System.out.println(formatted);
    }
    }
    package seedu.tojava.util;

    public class Formatter {
    public static final String PREFIX = ">>";

    public static String format(String s){
    return PREFIX + s;
    }
    }

    Note how the class can use PREFIX and format() (instead of Formatter.PREFIX and Formatter.format()).

    When using the commandline to compile/run Java, you should take the package into account.

    If the seedu.tojava.Main class is defined in the file Main.java,

    • when compiling from the <source folder>, the command is:
      javac seedu/tojava/Main.java
    • when running it from the <compiler output folder>, the command is:
      java seedu.tojava.Main

    Guidance for the item(s) below:

    As the size of your Java code base grows, every class being able to access every member of every other class can be problematic. Hence, there should be a way to control the access to our Java classes and their members. The solution is given in the topic below.

    [W5.5] Java: Access Modifiers

    W5.5a

    C++ to Java → Miscellaneous Topics → Access modifiers

    Can explain access modifiers

    Access level modifiers determine whether other classes can use a particular field or invoke a particular method.

    There are two levels of access control:

    1. At the class level:

      • public: the class is visible to all classes everywhere
      • no modifier (the default, also known as package-private): it is visible only within its own package

    2. At the member level:

      • public or no modifier (package-private): same meaning as when used with top-level classes
      • private: the member can only be accessed in its own class
      • protected: the member can only be accessed within its own package (as with package-private) and, in addition, by a subclass of its class in another package

    The following table shows the access to members permitted by each modifier.

    Modifier whether the class itself has access to the member defined by the access levelClass whether classes in the same package as the class (regardless of their parentage) have access to the memberPackage whether subclasses of the class declared outside this package have access to the memberSubclass whether all classes have access to the memberWorld
    public
    protected
    no modifier
    private

    Access levels affect you in two ways:

    1. When you use classes that come from another source, such as the classes in the Java platform, access levels determine which members of those classes your own classes can use.
    2. When you write a class, you need to decide what access level every member variable and every method in your class should have.

    Guidance for the item(s) below:

    So far, your iP may have assumed a 'perfect world' e.g., user input is always in the expected format. To make the product ready for the not-so-perfect real world, the code should be able to handle error conditions. Let's learn how to do that.

    [W5.6] Error Handling: Exceptions

    W5.6a

    Implementation → Error Handling → Introduction → What

    Can explain error handling

    Well-written applications include error-handling code that allows them to recover gracefully from unexpected errors. When an error occurs, the application may need to request user intervention, or it may be able to recover on its own. In extreme cases, the application may log the user off or shut down the system. -- Microsoft

    W5.6b

    Implementation → Error Handling → Exceptions → What

    Can explain exceptions

    Exceptions are used to deal with 'unusual' but not entirely unexpected situations that the program might encounter at runtime.

    Exception:

    The term exception is shorthand for the phrase "exceptional event." An exception is an event, which occurs during the execution of a program, that disrupts the normal flow of the program's instructions. –- Java Tutorial (Oracle Inc.)

    Examples:

    • A network connection encounters a timeout due to a slow server.
    • The code tries to read a file from the hard disk but the file is corrupted and cannot be read.

    W5.6c

    Implementation → Error Handling → Exceptions → How

    Can explain how exception handling is done typically

    Most languages allow code that encountered an "exceptional" situation to encapsulate details of the situation in an Exception object and throw/raise that object so that another piece of code can catch it and deal with it. This is especially useful when the code that encountered the unusual situation does not know how to deal with it.

    The extract below from the -- Java Tutorial (with slight adaptations) explains how exceptions are typically handled.

    When an error occurs at some point in the execution, the code being executed creates an exception object and hands it off to the runtime system. The exception object contains information about the error, including its type and the state of the program when the error occurred. Creating an exception object and handing it to the runtime system is called throwing an exception.

    After a method throws an exception, the runtime system attempts to find something to handle it in the the ordered list of methods that had been called to get to the method where the error occurredcall stack. The runtime system searches the call stack for a method that contains a block of code that can handle the exception. This block of code is called an exception handler. The search begins with the method in which the error occurred and proceeds through the call stack in the reverse order in which the methods were called. When an appropriate handler is found, the runtime system passes the exception to the handler. An exception handler is considered appropriate if the type of the exception object thrown matches the type that can be handled by the handler.

    The exception handler chosen is said to catch the exception. If the runtime system exhaustively searches all the methods on the call stack without finding an appropriate exception handler, the program terminates.

    Advantages of exception handling in this way:

    • The ability to propagate error information through the call stack.
    • The separation of code that deals with 'unusual' situations from the code that does the 'usual' work.

    Which are the benefits of exceptions?

    • a. Exceptions allow us to separate normal code from error handling code.
    • b. Exceptions can prevent problems that happen in the environment.
    • c. Exceptions allow us to handle in one location an error raised in another location.

    (a) (c)

    Explanation: Exceptions cannot prevent problems in the environment. They can only be used to handle and recover from such problems.

    W5.6d

    C++ to Java → Exceptions → What are Exceptions?

    Can explain Java Exceptions

    Given below is an extract from the -- Java Tutorial, with some adaptations.

    There are three basic categories of exceptions In Java:

    • Checked exceptions: exceptional conditions that a well-written application should anticipate and recover from. All exceptions are checked exceptions, except for Error, RuntimeException, and their subclasses.

    Suppose an application prompts a user for an input file name, then opens the file by passing the name to the constructor for java.io.FileReader. Normally, the user provides the name of an existing, readable file, so the construction of the FileReader object succeeds, and the execution of the application proceeds normally. But sometimes the user supplies the name of a nonexistent file, and the constructor throws java.io.FileNotFoundException. A well-written program will catch this exception and notify the user of the mistake, possibly prompting for a corrected file name.

    • Errors: exceptional conditions that are external to the application, and that the application usually cannot anticipate or recover from. Errors are those exceptions indicated by Error and its subclasses.

    Suppose that an application successfully opens a file for input, but is unable to read the file because of a hardware or system malfunction. The unsuccessful read will throw java.io.IOError. An application might choose to catch this exception, in order to notify the user of the problem — but it also might make sense for the program to print a stack trace and exit.

    • Runtime exceptions: conditions that are internal to the application, and that the application usually cannot anticipate or recover from. Runtime exceptions are those indicated by RuntimeException and its subclasses. These usually indicate programming bugs, such as logic errors or improper use of an API.

    Consider the application described previously that passes a file name to the constructor for FileReader. If a logic error causes a null to be passed to the constructor, the constructor will throw NullPointerException. The application can catch this exception, but it probably makes more sense to eliminate the bug that caused the exception to occur.

    Errors and runtime exceptions are collectively known as unchecked exceptions.

    W5.6e

    C++ to Java → Exceptions → How to use Exceptions

    Can use Java Exceptions

    The content below uses extracts from the -- Java Tutorial, with some adaptations.

    A program can catch exceptions by using a combination of the try, catch blocks.

    • The try block identifies a block of code in which an exception can occur.
    • The catch block identifies a block of code, known as an exception handler, that can handle a particular type of exception.

    The writeList() method below calls a method process() that can cause two type of exceptions. It uses a try-catch construct to deal with each exception.

    public void writeList() {
    print("starting method");
    try {
    print("starting process");
    process();
    print("finishing process");

    } catch (IndexOutOfBoundsException e) {
    print("caught IOOBE");

    } catch (IOException e) {
    print("caught IOE");

    }
    print("finishing method");
    }

    Some possible outputs:

    No exceptions IOException IndexOutOfBoundsException
    starting method
    starting process
    finishing process
    finishing method
    starting method
    starting process
    finishing process
    caught IOE
    finishing method
    starting method
    starting process
    finishing process
    caught IOOBE
    finishing method

    You can use a finally block to specify code that is guaranteed to execute with or without the exception. This is the right place to close files, recover resources, and otherwise clean up after the code enclosed in the try block.

    The writeList() method below has a finally block:

    public void writeList() {
    print("starting method");
    try {
    print("starting process");
    process();
    print("finishing process");

    } catch (IndexOutOfBoundsException e) {
    print("caught IOOBE");

    } catch (IOException e) {
    print("caught IOE");

    } finally {
    // clean up
    print("cleaning up");
    }
    print("finishing method");
    }

    Some possible outputs:

    No exceptions IOException IndexOutOfBoundsException
    starting method
    starting process
    finishing process
    cleaning up
    finishing method
    starting method
    starting process
    finishing process
    caught IOE
    cleaning up
    finishing method
    starting method
    starting process
    finishing process
    caught IOOBE
    cleaning up
    finishing method
    • The try statement should contain at least one catch block or a finally block and may have multiple catch blocks.

    • The class of the exception object indicates the type of exception thrown. The exception object can contain further information about the error, including an error message.

    You can use the throw statement to throw an exception. The throw statement requires a Throwable objects are instances of any subclass of the Throwable class.throwable object as the argument.

    Here's an example of a throw statement.

    if (size == 0) {
    throw new EmptyStackException();
    }

    In Java, Checked exceptions are subject to the Catch or Specify Requirement: code that might throw checked exceptions must be enclosed by either of the following:

    • A try statement that catches the exception. The try must provide a handler for the exception.
    • A method that specifies that it can throw the exception. The method must provide a throws clause that lists the exception.

    Unchecked exceptions are not required to follow to the Catch or Specify Requirement but you can apply the requirement to them too.

    Here's an example of a method specifying that it throws certain checked exceptions:

    public void writeList() throws IOException, IndexOutOfBoundsException {
    print("starting method");
    process();
    print("finishing method");
    }
    Some possible outputs:
    
    No exceptions IOException IndexOutOfBoundsException
    starting method
    finishing method
    starting method
    finishing method
    starting method
    finishing method

    Java comes with a collection of built-in exception classes that you can use. When they are not enough, it is possible to create your own exception classes.

    The Main class below parses a string descriptor of a rectangle of the format "WIDTHxHEIGHT" e.g., "3x4" and prints the area of the rectangle.

    public class Main {

    public static void printArea(String descriptor){
    //TODO: modify the code below
    System.out.println(descriptor + "=" + calculateArea(descriptor));
    }

    private static int calculateArea(String descriptor) {
    //TODO: modify the code below
    String[] dimensions = descriptor.split("x");
    return Integer.parseInt(dimensions[0]) * Integer.parseInt(dimensions[1]);
    }

    public static void main(String[] args) {
    printArea("3x4");
    printArea("5x5");
    }
    }

    3x4=12
    5x5=25
    1. Update the code of printArea to print an error message if WIDTH and/or HEIGHT are not numbers e.g., "Ax4"
      calculateArea will throw the unchecked exception NumberFormatException if the code tries to parse a non-number to an integer.

    2. Update the code of printArea to print an error message if the descriptor is missing WIDTH and/or HEIGHT e.g., "x4"
      calculateArea will throw the unchecked exception IndexOutOfBoundsException if one or both dimensions are missing.

    3. Update the code of calculateArea to throw the checked exception IllegalShapeException if there are more than 2 dimensions e.g., "5x4x3" and update the printArea to print an error message for those cases. Here is the code for the IllegalShapeException.java

    public class IllegalShapeException extends Exception {
    //no other code needed
    }

    Here is the expected behavior after you have done the above changes:

    public class Main {

    //...

    public static void main(String[] args) {
    printArea("3x4");
    printArea("3xy");
    printArea("3x");
    printArea("3");
    printArea("3x4x5");
    }
    }

    3x4=12
    WIDTH or HEIGHT is not a number: 3xy
    WIDTH or HEIGHT is missing: 3x
    WIDTH or HEIGHT is missing: 3
    Too many dimensions: 3x4x5
    public class Main {

    public static void printArea(String descriptor){
    try {
    System.out.println(descriptor + "=" + calculateArea(descriptor));
    } catch (NumberFormatException e) {
    System.out.println("WIDTH or HEIGHT is not a number: " + descriptor);
    } // add more catch blocks here
    }

    private static int calculateArea(String descriptor) throws IllegalShapeException {
    String[] dimensions = descriptor.split("x");

    //throw IllegalShapeException here if dimensions.length > 2

    return Integer.parseInt(dimensions[0]) * Integer.parseInt(dimensions[1]);
    }


    }

    W5.6f

    Implementation → Error Handling → Exceptions → When

    Can avoid using exceptions to control normal workflow

    In general, use exceptions only for 'unusual' conditions. Use normal return statements to pass control to the caller for conditions that are 'normal'.

    Guidance for the item(s) below:

    This week, you will be dealing with the requirements aspect of the tP. While there isn't time in this week to learn that topic fully, let's learn a couple the techniques you'll be using to deal with requirements of your tP this week: user stories and feature lists.

    [W5.7] Specifying Requirements [quick peek ahead]


    User Stories

    W5.7a

    Requirements → Specifying Requirements → User Stories → Introduction

    Can write simple user stories

    User story: User stories are short, simple descriptions of a feature told from the perspective of the person who desires the new capability, usually a user or customer of the system. [Mike Cohn]

    A common format for writing user stories is:

    User story format: As a {user type/role} I can {function} so that {benefit}

    Examples (from a Learning Management System):

    1. As a student, I can download files uploaded by lecturers, so that I can get my own copy of the files
    2. As a lecturer, I can create discussion forums, so that students can discuss things online
    3. As a tutor, I can print attendance sheets, so that I can take attendance during the class

    You can write user stories on index cards or sticky notes, and arrange them on walls or tables, to facilitate planning and discussion. Alternatively, you can use a software (e.g., GitHub Project Boards, Trello, Google Docs, ...) to manage user stories digitally.

    [credit: https://www.flickr.com/photos/jakuza/2682466984/]

    [credit: https://www.flickr.com/photos/jakuza/with/2726048607/]

    [credit: https://commons.wikimedia.org/wiki/File:User_Story_Map_in_Action.png]

    • a. They are based on stories users tell about similar systems
    • b. They are written from the user/customer perspective
    • c. They are always written in some physical medium such as index cards or sticky notes
    • a. Reason: Despite the name, user stories are not related to 'stories' about the software.
    • b.
    • c. Reason: It is possible to use software to record user stories. When the team members are not co-located this may be the only option.

    Critique the following user story taken from a software project to build an e-commerce website.

    As a developer, I want to use Python to implement the software, so that we can reuse existing Python modules.

    Refer to the definition of a user story.

    User story: User stories are short, simple descriptions of a feature told from the perspective of the person who desires the new capability, usually a user or customer of the system. [Mike Cohn]

    This user story is not written from the perspective of the user/customer.

    Bill wants you to build a Human Resource Management (HRM) system. He mentions that the system will help employees to view their own The number of leave days not yet takenleave balance. What are the user stories you can extract from that statement?

    Remember to follow the correct format when writing user stories.

    User story format: As a {user type/role} I can {function} so that {benefit}

    As an employee, I can view my leave balance, so that I can know how many leave days I have left.

    Note: the {benefit} part may vary as it is not specifically mentioned in the question.

    W5.7b

    Requirements → Specifying Requirements → User Stories → Details

    Can write more detailed user stories

    The {benefit} can be omitted if it is obvious.

    As a user, I can login to the system so that I can access my data

    It is recommended to confirm there is a concrete benefit even if you omit it from the user story. If not, you could end up adding features that have no real benefit.

    You can add more characteristics to the {user role} to provide more context to the user story.

    • As a forgetful user, I can view a password hint, so that I can recall my password.
    • As an expert user, I can tweak the underlying formatting tags of the document, so that I can format the document exactly as I need.

    You can write user stories at various levels. High-level user stories, called epics (or themes) cover bigger functionality. You can then break down these epics to multiple user stories of normal size.

    [Epic] As a lecturer, I can monitor student participation levels

    • As a lecturer, I can view the forum post count of each student
      so that I can identify the activity level of students in the forum
    • As a lecturer, I can view webcast view records of each student
      so that I can identify the students who did not view webcasts
    • As a lecturer, I can view file download statistics of each student
      so that I can identify the students who did not download lecture materials

    You can add conditions of satisfaction to a user story to specify things that need to be true for the user story implementation to be accepted as ‘done’.

    As a lecturer, I can view the forum post count of each student so that I can identify the activity level of students in the forum.

    Conditions:

    Separate post count for each forum should be shown
    Total post count of a student should be shown
    The list should be sortable by student name and post count

    Other useful info that can be added to a user story includes (but not limited to)

    • Priority: how important the user story is
    • Size: the estimated effort to implement the user story
    • Urgency: how soon the feature is needed
    More examples extra

    User stories for a travel website (credit: Mike Cohen)

    • As a registered user, I am required to log in so that I can access the system
    • As a forgetful user, I can request a password reminder so that I can log in if I forget mine
    • [Epic] As a user, I can cancel a reservation
      • As a premium site member, I can cancel a reservation up to the last minute
      • As a non-premium member, I can cancel up to 24 hours in advance
      • As a member, I am emailed a confirmation of any cancelled reservation
    • [Epic] As a frequent flyer, I want to book a trip
      • As a frequent flyer, I want to book a trip using miles
      • As a frequent flyer, I want to rebook a trip I take often
      • As a frequent flyer, I want to request an upgrade
      • As a frequent flyer, I want to see if my upgrade cleared

    Choose the correct statements

    • a. User stories are short and written in a formal notation.
    • b. User stories is another name for use cases.
    • c. User stories describes past experiences users had with similar systems. These are helpful in developing the new system.
    • d. User stories are not detailed enough to tell us exact details of the product.

    d

    Explanation: User stories are short and written in natural language, NOT in a formal language. They are used for estimation and scheduling purposes but do not contain enough details to form a complete system specification.

    W5.7c

    Requirements → Specifying Requirements → User Stories → Usage

    Can use user stories to manage requirements of project

    User stories capture user requirements in a way that is convenient for i.e. which features to include in the productscoping, i.e. how much effort each feature will takeestimation, and i.e. when to deliver each featurescheduling.

    [User stories] strongly shift the focus from writing about features to discussing them. In fact, these discussions are more important than whatever text is written. [Mike Cohn, MountainGoat Software 🔗]

    User stories differ from e.g. a description of the requirements written in prosetraditional requirements specifications mainly in the level of detail. User stories should only provide enough details to make a reasonably low risk estimate of how long the user story will take to implement. When the time comes to implement the user story, the developers will meet with the customer face-to-face to work out a more detailed description of the requirements. [more...]

    User stories can capture non-functional requirements too because even NFRs must benefit some stakeholder.

    Requirements → Requirements →

    Non-functional requirements

    Requirements can be divided into two in the following way:

    1. Functional requirements specify what the system should do.
    2. Non-functional requirements specify the constraints under which the system is developed and operated.

    Some examples of non-functional requirement categories:

    • Data requirements e.g. size, how often do data changevolatility, saving data permanentlypersistency etc.,
    • Environment requirements e.g. technical environment in which the system would operate in or needs to be compatible with.
    • Accessibility, Capacity, Compliance with regulations, Documentation, Disaster recovery, Efficiency, Extensibility, Fault tolerance, Interoperability, Maintainability, Privacy, Portability, Quality, Reliability, Response time, Robustness, Scalability, Security, Stability, Testability, and more ...
    • Business/domain rules: e.g. the size of the minefield cannot be smaller than five.
    • Constraints: e.g. the system should be backward compatible with data produced by earlier versions of the system; system testers are available only during the last month of the project; the total project cost should not exceed $1.5 million.
    • Technical requirements: e.g. the system should work on both 32-bit and 64-bit environments.
    • Performance requirements: e.g. the system should respond within two seconds.
    • Quality requirements: e.g. the system should be usable by a novice who has never carried out an online purchase.
    • Process requirements: e.g. the project is expected to adhere to a schedule that delivers a feature set every one month.
    • Notes about project scope: e.g. the product is not required to handle the printing of reports.
    • Any other noteworthy points: e.g. the game should not use images deemed offensive to those injured in real mine clearing activities.

    You may have to spend an extra effort in digging NFRs out as early as possible because,

    1. NFRs are easier to miss e.g., stakeholders tend to think of functional requirements first
    2. sometimes NFRs are critical to the success of the software. E.g. A web application that is too slow or that has low security is unlikely to succeed even if it has all the right functionality.

    Given below are some requirements of TEAMMATES (an online peer evaluation system for education). Which one of these are non-functional requirements?

    • a. The response to any use action should become visible within 5 seconds.
    • b. The application admin should be able to view a log of user activities.
    • c. The source code should be open source.
    • d. A course should be able to have up to 2000 students.
    • e. As a student user, I can view details of my team members so that I can know who they are.
    • f. The user interface should be intuitive enough for users who are not IT-savvy.
    • g. The product is offered as a free online service.

    (a)(c)(d)(f)(g)

    Explanation: (b) are (e) are functions available for a specific user types. Therefore, they are functional requirements. (a), (c), (d), (f) and (g) are either constraints on functionality or constraints on how the project is done, both of which are considered non-functional requirements.

    An example of an NFR captured as a user story:

    As a I want to so that
    impatient user to be able experience reasonable response time from the website while up to 1000 concurrent users are using it I can use the app even when the traffic is at the maximum expected level

    Given their lightweight nature, user stories are quite handy for recording requirements during early stages of requirements gathering.

    A recipe for brainstorming user stories

    Given below is a possible recipe you can take when using user stories for early stages of requirement gathering.

    Step 0: Clear your mind of preconceived product ideas

    Even if you already have some idea of what your product will look/behave like in the end, clear your mind of those ideas. The product is the solution. At this point, we are still at the stage of figuring out the problem (i.e., user requirements). Let's try to get from the problem to the solution in a systematic way, one step at a time.

    Step 1: Define the target user as a persona:

    Decide your target user's profile (e.g. a student, office worker, programmer, salesperson) and work patterns (e.g. Does he work in groups or alone? Does he share his computer with others?). A clear understanding of the target user will help when deciding the importance of a user story. You can even narrow it down to a persona. Here is an example:

    Jean is a university student studying in a non-IT field. She interacts with a lot of people due to her involvement in university clubs/societies. ...

    Step 2: Define the problem scope:

    Decide the exact problem you are going to solve for the target user. It is also useful to specify what related problems it will not solve so that the exact scope is clear.

    ProductX helps Jean keep track of all her school contacts. It does not cover communicating with contacts.

    Step 3: List scenarios to form a narrative:

    Think of the various scenarios your target user is likely to go through as she uses your app. Following a chronological sequence as if you are telling a story might be helpful.

    A. First use:

    1. Jean gets to know about ProductX. She downloads it and launches it to check out what it can do.
    2. After playing around with the product for a bit, Jean wants to start using it for real.
    3. ...

    B. Second use: (Jean is still a beginner)

    1. Jean launches ProductX. She wants to find ...
    2. ...

    C. 10th use: (Jean is a little bit familiar with the app)

    1. ...

    D. 100th use: (Jean is an expert user)

    1. Jean launches the app and does ... and ... followed by ... as per her usual habit.
    2. Jean feels some of the data in the app are no longer needed. She wants to get rid of them to reduce clutter.

    More examples that might apply to some products:

    • Jean uses the app at the start of the day to ...
    • Jean uses the app before going to sleep to ...
    • Jean hasn't used the app for a while because she was on a three-month training programme. She is now back at work and wants to resume her daily use of the app.
    • Jean moves to another company. Some of her clients come with her but some don't.
    • Jean starts freelancing in her spare time. She wants to keep her freelancing clients separate from her other clients.

    Step 4: List the user stories to support the scenarios:

    Based on the scenarios, decide on the user stories you need to support. For example, based on the scenario 'A. First use', you might have user stories such as these:

    • As a potential user exploring the app, I can see the app populated with sample data, so that I can easily see how the app will look like when it is in use.
    • As a user ready to start using the app, I can purge all current data, so that I can get rid of sample/experimental data I used for exploring the app.

    To give another example, based on the scenario 'D. 100th use', you might have user stories such as these:

    • As an expert user, I can create shortcuts for tasks, so that I can save time on frequently performed tasks.
    • As a long-time user, I can archive/hide unused data, so that I am not distracted by irrelevant data.

    Do not 'evaluate' the value of user stories while brainstorming. Reason: an important aspect of brainstorming is not judging the ideas generated.

    Other tips:

    • Don't be too hasty to discard 'unusual' user stories:
      Those might make your product unique and stand out from the rest, at least for the target users.
    • Don't go into too much details:
      For example, consider this user story: As a user, I want to see a list of tasks that needs my attention most at the present time, so that I pay attention to them first.
      When discussing this user story, don't worry about what tasks should be considered needs my attention most at the present time. Those details can be worked out later.
    • Don't be biased by preconceived product ideas:
      When you are at the stage of identifying user needs, clear your mind of ideas you have about what your end product will look like. That is, don't try to reverse-engineer a preconceived product idea into user stories.
    • Don't discuss implementation details or whether you are actually going to implement it:
      When gathering requirements, your decision is whether the user's need is important enough for you to want to fulfil it. Implementation details can be discussed later. If a user story turns out to be too difficult to implement later, you can always omit it from the implementation plan.

    While use cases can be recorded on e.g. index cards or sticky notesphysical paper in the initial stages, an online tool is more suitable for longer-term management of user stories, especially if the team is not physically in the same locationco-located.

    You can create issues for each of the user stories and use a GitHub Project Board to sort them into categories.

    Example Project Board:

    Example Issue to represent a user story:

    You can break the user story into issue subject and description in this way:

    title As a user I can add a deadline
    Description ... so that I can keep track of my deadlines

    Alternatively, you can put the entire user story in the description.

    title Add deadline
    Description As a user I can so that I can keep track of my deadlines

    In both cases, apply the type.Story label.

    A video on GitHub Project Boards:

    Example Google Sheet for recording user stories:

    Example Trello Board for recording user stories:

    eXtreme Programming (XP)eXtreme Programming (XP)

    Extreme programming (XP) is a software development methodology which is intended to improve software quality and responsiveness to changing customer requirements. As a type of agile software development, it advocates frequent "releases" in short development cycles, which is intended to improve productivity and introduce checkpoints at which new customer requirements can be adopted. [wikipedia, 2017.05.01]

    uses User stories to capture requirements.

    This page in their website explains the difference between user stories and traditional requirements.

    One of the biggest misunderstandings with user stories is how they differ from traditional requirements specifications. The biggest difference is in the level of detail. User stories should only provide enough detail to make a reasonably low risk estimate of how long the story will take to implement. When the time comes to implement the story developers will go to the customer and receive a detailed description of the requirements face to face.


    Feature Lists

    W5.7d

    Requirements → Specifying Requirements → Feature Lists → What

    Can explain feature list

    Feature list: A list of features of a product grouped according to some criteria such as aspect, priority, order of delivery, etc.

    A sample feature list from a simple Minesweeper game (only a brief description has been provided to save space):

    1. Basic play – Single player play.
    2. Difficulty levels
      • Medium levels
      • Advanced levels
    3. Versus play – Two players can play against each other.
    4. Timer – Additional fixed time restriction on the player.
    5. ...

    Guidance for the item(s) below:

    Let's learn about a few more Git techniques, starting with branching. Although these techniques are not really needed for the iP, we force you to use them in the iP so that you have more time to practice them before they are really needed in the tP.

    [W5.8] RCS: Branching

    W5.8a

    Project Management → Revision Control → Branching

    Can explain branching

    Branching is the process of evolving multiple versions of the software in parallel. For example, one team member can create a new branch and add an experimental feature to it while the rest of the team keeps working on another branch. Branches can be given names e.g. master, release, dev.

    A branch can be merged into another branch. Merging usually results in a new commit that represents the changes done in the branch being merged.

    Branching and merging

    Merge conflicts happen when you try to merge two branches that had changed the same part of the code and the RCS cannot decide which changes to keep. In those cases, you have to ‘resolve’ the conflicts manually.

    In the context of RCS, what is branching? What is the need for branching?

    In the context of RCS, what does merging branches mean? How can it lead to merge conflicts?

    W5.8b

    Tools → Git and GitHub → branch: Doing multiple parallel changes

    Can use Git branching

    Git supports branching, which allows you to do multiple parallel changes to the content of a repository.

    A Git branch is simply a named label pointing to a commit. The HEAD label indicates which branch you are on. Git creates a branch named master by default. When you add a commit, it goes into the branch you are currently on, and the branch label (together with the HEAD label) moves to the new commit.

    Given below is an illustration of how branch labels move as branches evolve.

    1. There is only one branch (i.e., master) and there is only one commit on it.
    2. A new commit has been added. The master and the HEAD labels have moved to the new commit.
    3. A new branch fix1 has been added. The repo has switched to the new branch too (hence, the HEAD label is attached to the fix1 branch).
    4. A new commit (c) has been added. The current branch label fix1 moves to the new commit, together with the HEAD label.
    5. The repo has switched back to the master branch.

    1. A new commit (d) has been added. The master label has moved to that commit.
    2. The repo has switched back to the fix1 branch and added a new commit (e) to it.
    3. The repo has switched to the master branch and the fix1 branch has been merged into the master branch, creating a merge commit f. The repo is currently on the master branch.

    Follow the steps below to learn how to work with branches. You can use any repo you have on your computer (e.g. a clone of the samplerepo-things) for this.

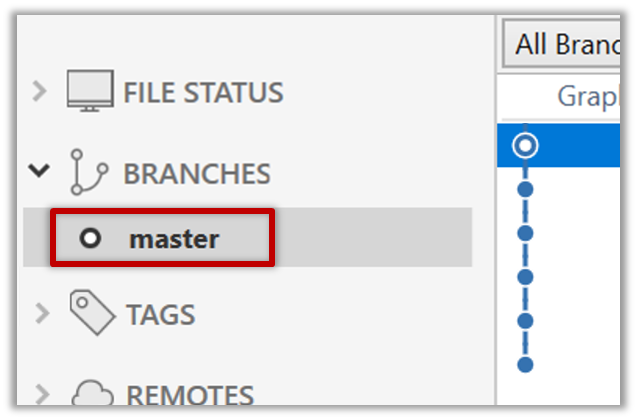
    0. Observe that you are normally in the branch called master.

    git status

    on branch master

    1. Start a branch named feature1 and switch to the new branch.

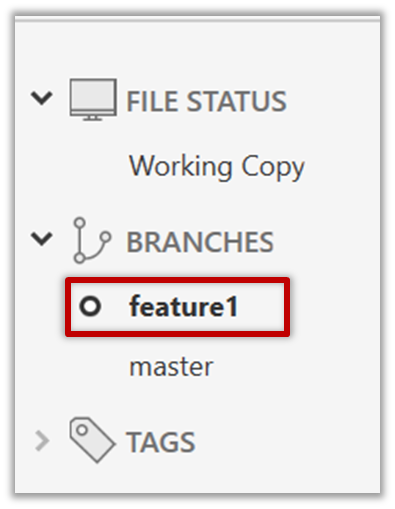
    Click on the Branch button on the main menu. In the next dialog, enter the branch name and click Create Branch.

    Note how the feature1 is indicated as the current branch.

    You can use the branch command to create a new branch and the checkout command to switch to a specific branch.

    git branch feature1
    git checkout feature1

    One-step shortcut to create a branch and switch to it at the same time:

    git checkout –b feature1

    2. Create some commits in the new branch. Just commit as per normal. Commits you add while on a certain branch will become part of that branch.
    Note how the master label and the HEAD label moves to the new commit (The HEAD label of the local repo is represented as in SourceTree).

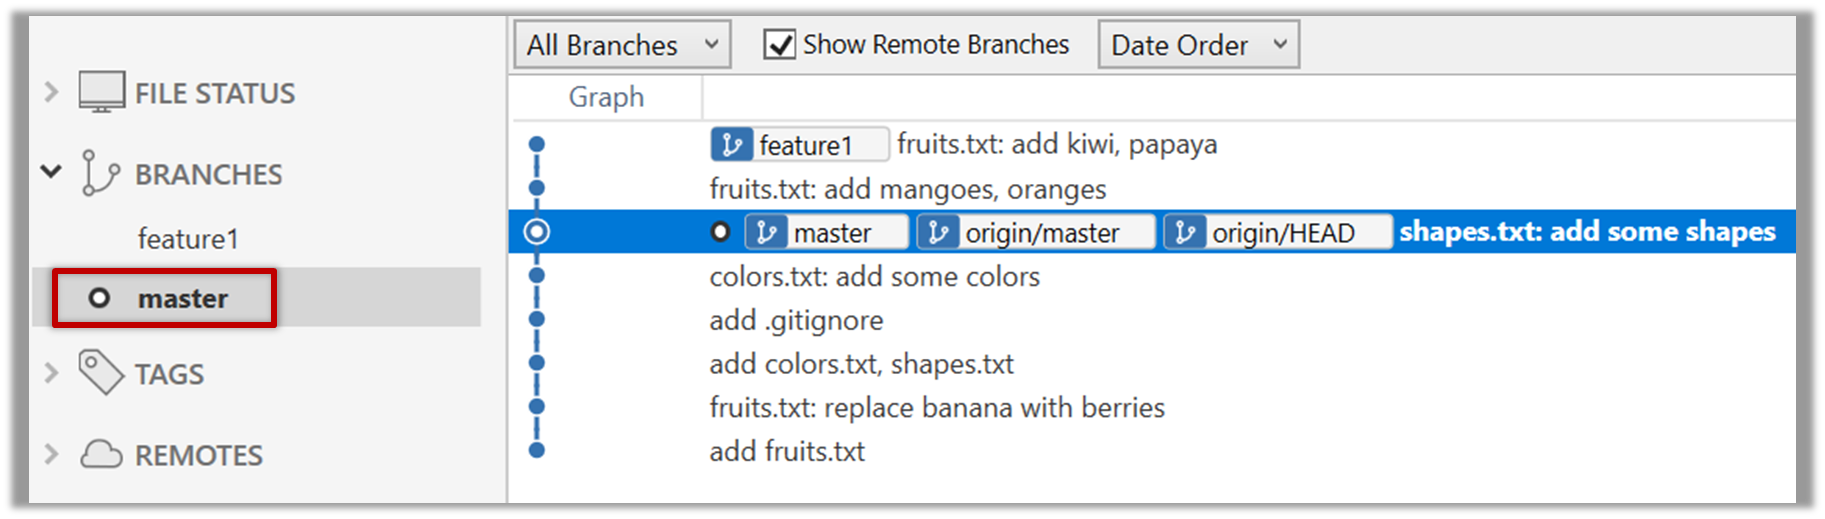
    3. Switch to the master branch. Note how the changes you did in the feature1 branch are no longer in the working directory.

    Double-click the master branch.

    git checkout master

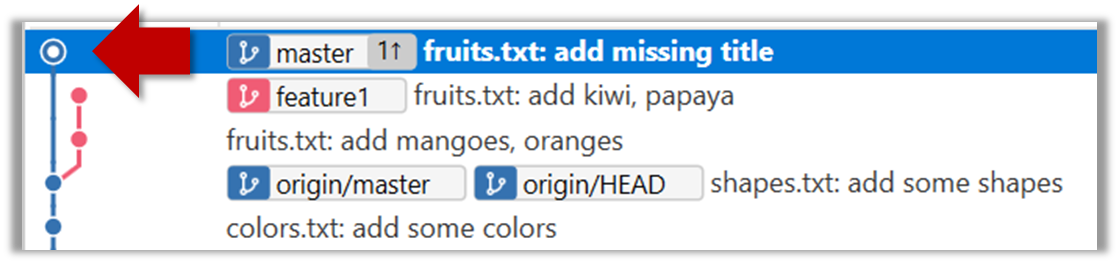
    4. Add a commit to the master branch. Let’s imagine it’s a bug fix.
    To keep things simple for the time being, this commit should not involve the same content that you changed in the feature1 branch. To be on the safe side, this commit can change an entirely different file.

    5. Switch back to the feature1 branch (similar to step 3).

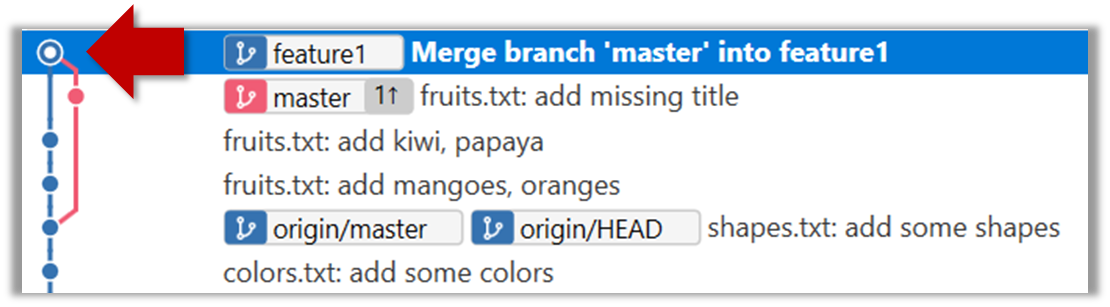
    6. Merge the master branch to the feature1 branch, giving an end-result like the following. Also note how Git has created a merge commit.

    Right-click on the master branch and choose merge master into the current branch. Click OK in the next dialog.

    git merge master

    The objective of that merge was to sync the feature1 branch with the master branch. Observe how the changes you did in the master branch (i.e. the imaginary bug fix) is now available even when you are in the feature1 branch.

    Instead of merging master to feature1, an alternative is to rebase the feature1 branch. However, rebasing is an advanced feature that requires modifying past commits. If you modify past commits that have been pushed to a remote repository, you'll have to force-push the modified commit to the remote repo in order to update the commits in it.

    7. Add another commit to the feature1 branch.

    8. Switch to the master branch and add one more commit.

    9. Merge feature1 to the master branch, giving and end-result like this:
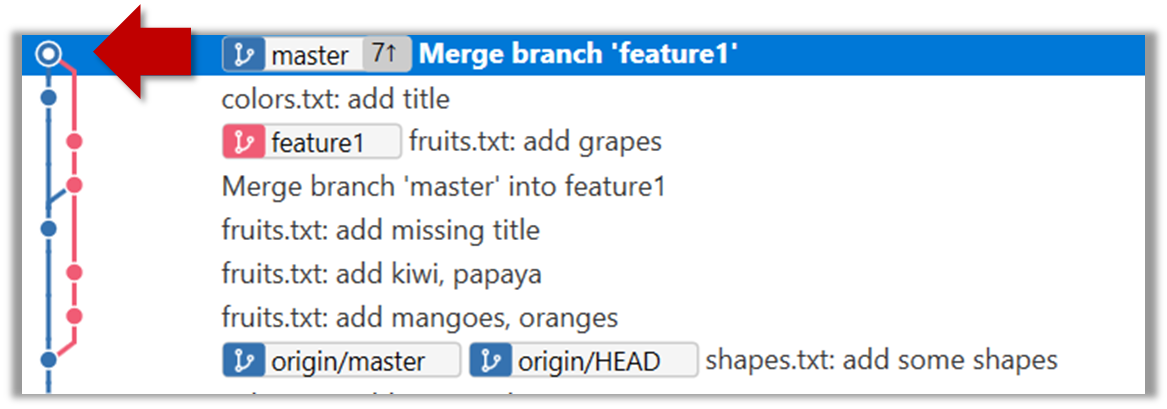
    Right-click on the feature1 branch and choose Merge....

    git merge feature1

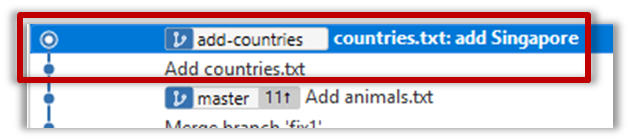
    10. Create a new branch called add-countries, switch to it, and add some commits to it (similar to steps 1-2 above). You should have something like this now:

    Avoid this common rookie mistake!

    Always remember to switch back to the master branch before creating a new branch. If not, your new branch will be created on top of the current branch.

    11. Go back to the master branch and merge the add-countries branch onto the master branch (similar to steps 8-9 above). While you might expect to see something like the following,

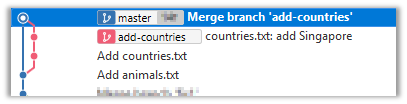
    ... you are likely to see something like this instead:

    That is because Git does a fast forward merge if possible. Seeing that the master branch has not changed since you started the add-countries branch, Git has decided it is simpler to just put the commits of the add-countries branch in front of the master branch, without going into the trouble of creating an extra merge commit.

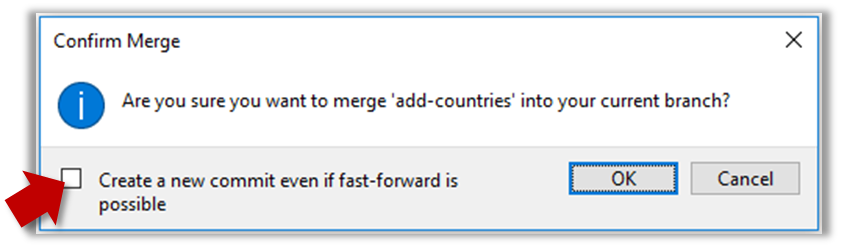
    It is possible to force Git to create a merge commit even if fast forwarding is possible.

    Tick the box shown below when you merge a branch:

    Use the --no-ff switch (short for no fast forward):

    git merge --no-ff add-countries
    Pushing a branch to a remote repo

    Here's how to push a branch to a remote repo:

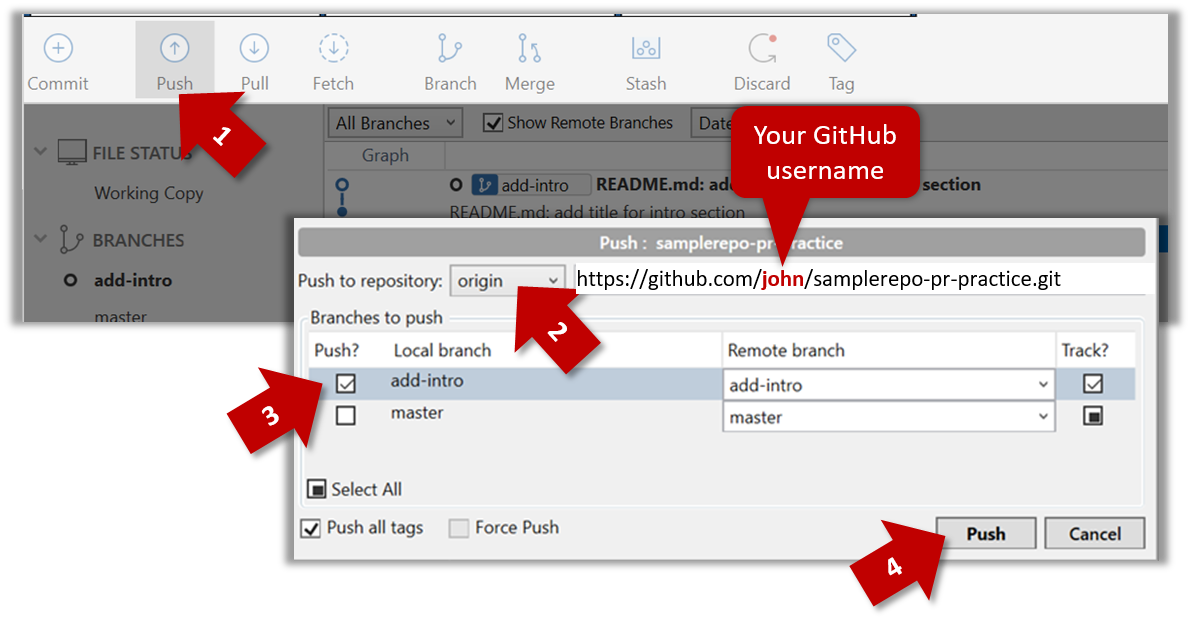
    Here's how to push a branch named add-intro to your own fork of a repo named samplerepo-pr-practice:

    Normally: git push {remote repository} {branch}. Examples:

    • git push origin master pushes the master branch to the repo named origin (i.e., the repo you cloned from)
    • git push upstream-repo add-intro pushes the add-intro branch to the repo named upstream-repo

    If pushing a branch you created locally to the remote for the first time, add the -u flag to get the local branch to track the new upstream branch:
    e.g., git push -u origin add-intro

    See git-scm.com/docs/git-push for details of the push command.