This site is from a past semester! The current version will be here when the new semester starts.
CS2113/T 2020 Aug-Dec
  • Full Timeline
  • Week 1 [Mon, Aug 10th]
  • Week 2 [Fri, Aug 14th]
  • Week 3 [Fri, Aug 21st]
  • Week 4 [Fri, Aug 28th]
  • Week 5 [Fri, Sep 4th]
  • Week 6 [Fri, Sep 11th]
  • Week 7 [Fri, Sep 18th]
  • Week 8 [Fri, Oct 2nd]
  • Week 9 [Fri, Oct 9th]
  • Week 10 [Fri, Oct 16th]
  • Week 11 [Fri, Oct 23rd]
  • Week 12 [Fri, Oct 30th]
  • Week 13 [Fri, Nov 6th]
  • Textbook
  • Admin Info
  • Report Bugs
  • Forum
  • Gitter (Chat)
  • Instructors
  • Announcements
  • Files
  • Tutorial Schedule
  • repl.it link
  • repl.it link (duplicated)
  • Java Coding Standard
  • Git Conventions
  • Forum Activities Dashboard
  • Participation Dashboard

  •  Individual Project (iP):
  • Individual Project Info
  • iP Upstream Repo
  • iP Code Dashboard
  • iP Progress Dashboard

  •  Team Project (tP):
  • Reference AB3
  • Team Project Info
  • Team List
  • tP Code Dashboard
  • tP Progress Dashboard
  • Week 7 [Fri, Sep 18th] - Tutorial

    Guidance for the item(s) below:

    By the end of this tutorial, we want to confirm that you are able to apply Git and GitHub techniques you learned so far to follow a systematic workflow when updating the code.

    1 Set up tP org/repo

    • To be done in Zoom breakout rooms (per team).
    • Set up the team org, team fork, individual forks as described below:

    tP Team Organization Setup

    Please follow the organization/repo name format precisely or else our grading scripts will not be able to detect your work.

    (/) Only one team member:

    After receiving your team ID, one team member should do the following steps:

    • Create a GitHub organization with the following details:
      • Organization name (all UPPER CASE) : AY2021S1-TEAM_ID. e.g.  AY2021S1-CS2113T-W12-1, AY2021S1-CS2113-T09-2
      • Plan:  Open Source ($0/month)
      • This organization belongs to: My personal account
    • Add members to the organization:
      • Create a team called developers to your organization.
      • Add your team members to the developers team.

    tP Team Repo Setup

    (/) Only one team member:

    The tP project template given to you is a variation of the iP repo you used for the iP, but with some important differences. Please follow instructions carefully, rather than follow what you remember from the iP.

    1. Fork the https://github.com/nus-cs2113-AY2021S1/tp repo to your team org.

      • This repo (let's call it the team repo) is to be used as the repo for your project.
      • Please do not rename the fork Reason: our grading scripts rely on the repo name.
    2. Enable the issue tracker.

    3. Enable GitHub Actions: Go to the Actions tab and enable workflows by clicking the button. That will enable the GitHub Actions that are already included in the repo you forked.

    4. Enable GitHub Pages: Go to the Settings tab and enable GitHub Pages for the master branch /docs folder (similar to how you did it in the iP).
      Remember to choose a theme too by clicking the button (that will create a commit in your repo that is needed in a later step.
      After a few minutes, confirm your tP website is available in the corresponding github.io URL.

    5. Add members. Ensure your team members have the desired level of access to your team repo.
      Recommended: Give admin access to 1-2 members and write access to others.

    6. Create a team PR for us to track your project progress: i.e., create a PR from your team repo master branch to [nus-cs2113-AY2021S1/tp] master branch. PR name: [Team ID] Product Name e.g., [CS2113-T09-2] Contact List Pro. As you merge code to your team repo's master branch, this PR will auto-update to reflect how much your team's product has progressed.
      Please fill in these details as specified because they are used by our grading scripts.

      • PR subject: the name of your product e.g., InsureList
      • Description: a 1-2 sentence overview (plain text only, no formatting or links) of your project indicating the target user and the value proposition e.g., InsureList helps insurance agents manage detail of their clients. It is optimized for CLI users so that frequent tasks can be done faster by typing in commands.

    tP Individual Fork Setup

    (, , , ...) Every team member:

    1. Watch the tP repo (created above) i.e., go to the repo and click on the button to subscribe to activities of the repo.
    2. Fork the tP repo to your personal GitHub account.
      Please do not rename the fork Reason: our grading scripts rely on the repo name.
    3. Clone the fork to your computer.
    4. Set up the developer environment in your computer by following the the README carefully as the steps are different from the iP.

    Do not alter these paths in your project as our grading scripts depend on them.

    • src/main/java
    • src/test/java
    • docs

    • [Each person] Verify that you know how to do the following by performing each on hour computer and posting a screenshot in the tutorial workspace document:
      • run the code in your IDE
      • run I/O redirection tests
      • verify compliance with the coding standard automatically using Gradle

    2 Update the code using the forking workflow

    In this activity you will be using the forking workflow to do some simple updates to the code base while working in parallel. The objective is to ensure you know how to follow the expected working in the tP. The steps are given below:

    First, ensure that you know how the forking workflow works.

    In the forking workflow, the 'official' version of the software is kept in a remote repo designated as the 'main repo'. All team members fork the main repo and create pull requests from their fork to the main repo.

    To illustrate how the workflow goes, let’s assume Jean wants to fix a bug in the code. Here are the steps:

    1. Jean creates a separate branch in her local repo and fixes the bug in that branch.
      Common mistake: Doing the proposed changes in the master branch -- if Jean does that, she will not be able to have more than one PR open at any time because any changes to the master branch will be reflected in all open PRs.
    2. Jean pushes the branch to her fork.
    3. Jean creates a pull request from that branch in her fork to the main repo.
    4. Other members review Jean’s pull request.
    5. If reviewers suggested any changes, Jean updates the PR accordingly.
    6. When reviewers are satisfied with the PR, one of the members (usually the team lead or a designated 'maintainer' of the main repo) merges the PR, which brings Jean’s code to the main repo.
    7. Other members, realizing there is new code in the upstream repo, sync their forks with the new upstream repo (i.e. the main repo). This is done by pulling the new code to their own local repo and pushing the updated code to their own fork.
      Possible mistake: Creating another 'reverse' PR from the team repo to the team member's fork to sync the member's fork with the merged code. PRs are meant to go from downstream repos to upstream repos, not in the other direction.

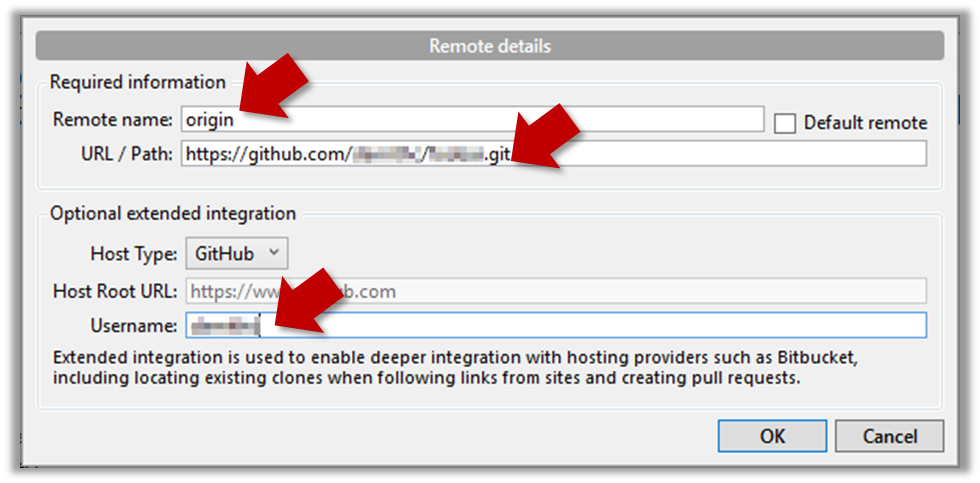
    Next, add the upstream as a remote: The forking workflow requires you to pull from the team repo and push to your own fork. To be able to do the former, you need to add the team repo as a remote of your clone. Follow the instructions in the panel below to add a new remote with the Remote name upstream (can be anything, but upstream is a common choice) and URL / Path pointing to the team repo
    e.g., https://github.com/AY2021S1-CS2113-T09-2/tp.git (note the .git at the end)

    Working with multiple remotes

    When you clone a repo, Git automatically adds a remote repo named origin to your repo configuration. As you know, you can pull commits from that repo. As you know, a Git repo can work with remote repos other than the one it was cloned from.

    A repo can work with any number of other repositories as long as they have a shared history e.g., repo1 can pull from (or push to) repo2 and repo3 if they have a shared history between them.

    To communicate with another remote repo, you can first add it as a remote of your repo. Here is an example scenario you can follow to learn how to pull from another repo:

    1. Open the local repo in SourceTree. Suggested: Use your local clone of the samplerepo-things repo.

    2. Choose RepositoryRepository Settings menu option.

    3. Add a new remote to the repo with the following values.

      • Remote name: the name you want to assign to the remote repo e.g., upstream1
      • URL/path: the URL of your repo (ending in .git) that. Suggested: https://github.com/se-edu/samplerepo-things-2.git (samplerepo-things-2 is another repo that has a shared history with samplerepo-things)
      • Username: your GitHub username

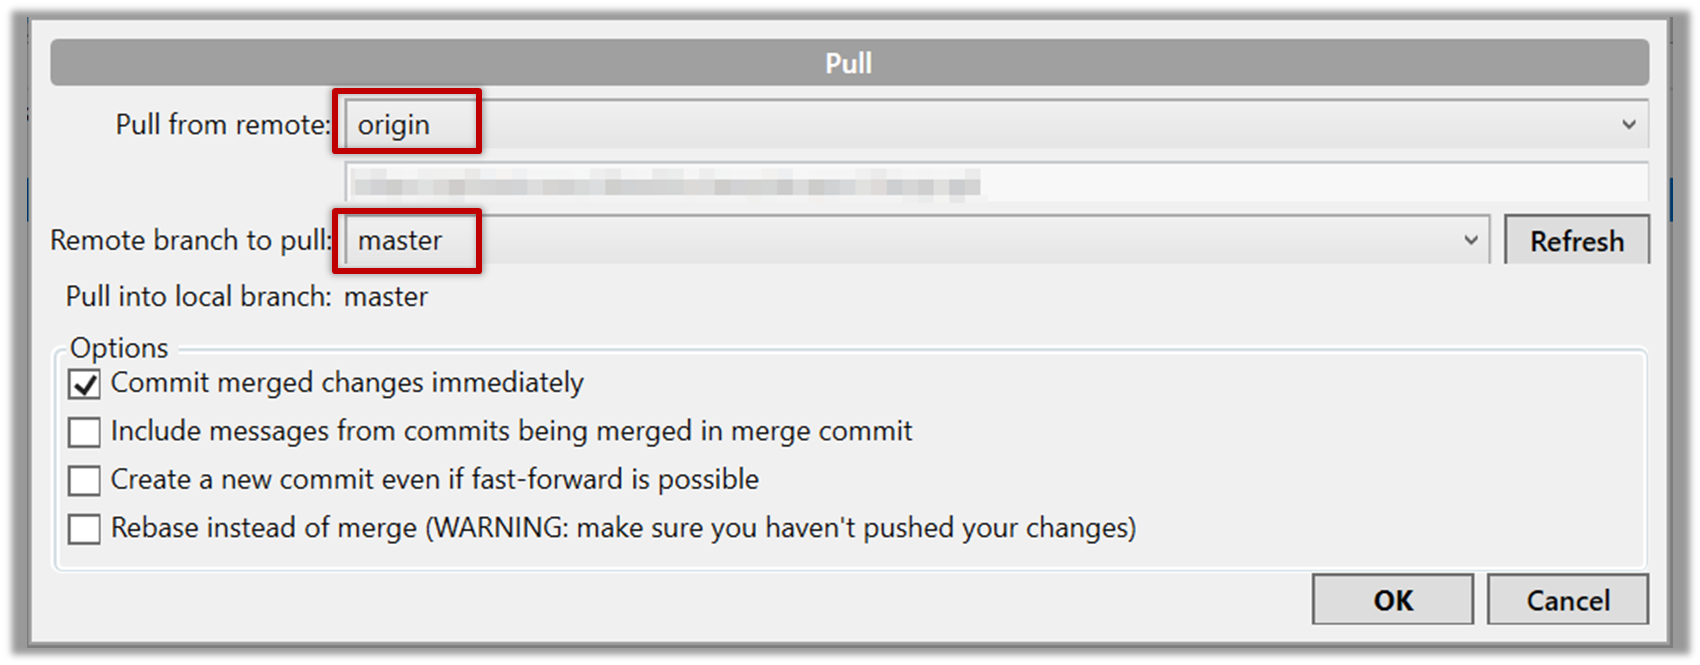
    4. Now, you can pull from the added repo as you did before but choose the remote name of the repo you want to pull from (instead of origin):

      If the Remote branch to pull dropdown is empty, click the Refresh button on its right.

    5. If the pull from the samplerepo-things-2 was successful, you should have received one more commit into your local repo.

    1. Navigate to the folder containing the local repo.

    2. Set the new remote repo as a remote of the local repo.
      command: git remote add {remote_name} {remote_repo_url}
      e.g., git remote add upstream1 https://github.com/johndoe/foobar.git

    3. Now you can pull from the new remote.
      e.g., git pull upstream1 master

    Now, follow these steps to update the code using the forking workflow e.g., each person can add their details to the docs/AboutUs.md page:

    • Step 1 Decide which update each person will do.
    • Step 2 Each person,
      • Step 2.a create a branch (e.g., johnDoe-AboutUs) in their local repo.
      • Step 2.b do the change in the branch.
      • Step 2.c push the branch to their own fork.
      • Step 2.d create a PR from their branch in the fork to the master branch of the team repo.
    • Step 3 Work as a team to merge one PR at a time.
      • If a PR cannot be merged due to conflicts, resolve conflicts as you go (PR conflict resolution was covered in the week 6 lecture activity).
      • Do not send PRs from team repo to individual repos as that goes against the forking workflow. PRs should only go from forks to the team repo.
      • For reference, PR merging instructions are in the following textbook section:

    Let's look at the steps involved in merging a PR, assuming the PR has been reviewed, refined, and approved for merging already.

    Preparation: If you would like to try merging a PR yourself, you can create a dummy PR in the following manner.

    1. Fork any repo (e.g., samplerepo-pr-practice).
    2. Clone in to your computer.
    3. Create a new branch e.g., (feature1) and add some commits to it.
    4. Push the new branch to the fork.
    5. Create a PR from that branch to the master branch in your fork. Yes, it is possible to create a PR within the same repo.

    1. Locate the PR to be merged in your repo's GitHub page.

    2. Click on the Conversation tab and scroll to the bottom. You'll see a panel containing the PR status summary.

    3. If the PR is not merge-able in the current state, the Merge pull request will not be green. Here are the possible reasons and remedies:

    • Problem: The PR code is out-of-date, indicated by the message This branch is out-of-date with the base branch. That means the repo's master branch has been updated since the PR code was last updated.
      • If the PR author has allowed you to update the PR and you have sufficient permissions, GitHub will allow you to update the PR simply by clicking the Update branch on the right side of the 'out-of-date' error message. If that option is not available, post a message in the PR requesting the PR author to update the PR.
    • Problem: There are merge conflicts, indicated by the message This branch has conflicts that must be resolved. That means the repo's master branch has been updated since the PR code was last updated, in a way that the PR code conflicts with the current master branch. Those conflicts must be resolved before the PR can be merged.
      • If the conflicts are simple, GitHub might allow you to resolve them using the Web interface.
      • If that option is not available, post a message in the PR requesting the PR author to update the PR.

    Tools → Git and GitHub →

    Dealing with merge conflicts

    Merge conflicts happen when you try to combine two incompatible versions (e.g., merging a branch to another but each branch changed the same part of the code in a different way).

    Here are the steps to simulate a merge conflict and use it to learn how to resolve merge conflicts.

    0. Create an empty repo or clone an existing repo, to be used for this activity.

    1. Start a branch named fix1 in the repo. Create a commit that adds a line with some text to one of the files.

    2. Switch back to master branch. Create a commit with a conflicting change i.e. it adds a line with some different text in the exact location the previous line was added.
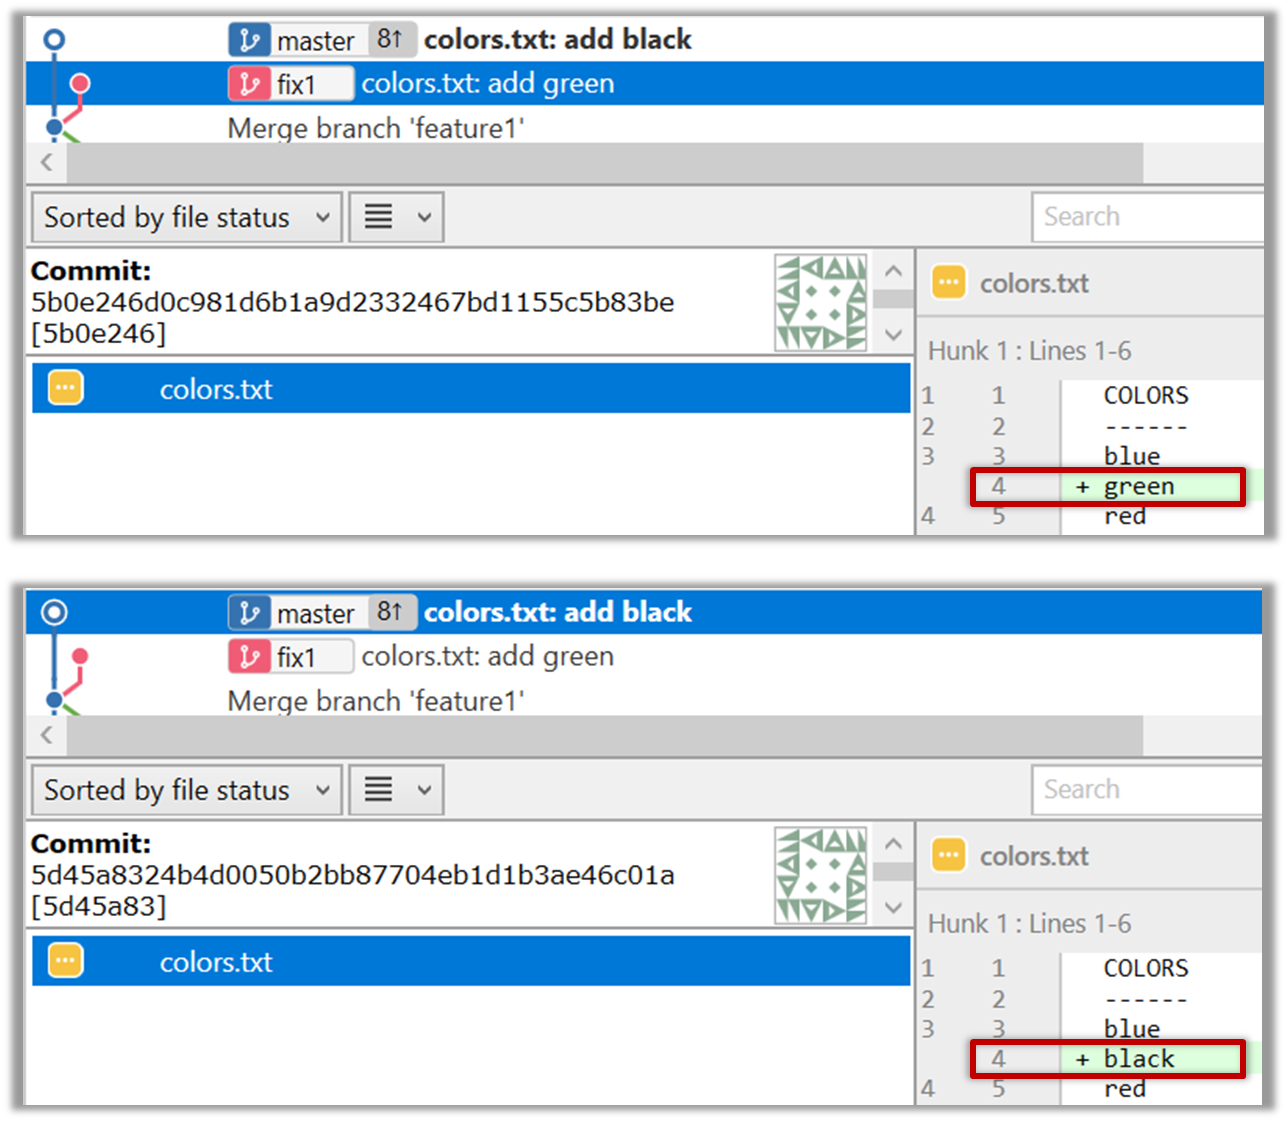
    3. Try to merge the fix1 branch onto the master branch. Git will pause mid-way during the merge and report a merge conflict. If you open the conflicted file, you will see something like this:

    COLORS
    ------
    blue
    <<<<<< HEAD
    black
    =======
    green
    >>>>>> fix1
    red
    white

    4. Observe how the conflicted part is marked between a line starting with <<<<<< and a line starting with >>>>>>, separated by another line starting with =======.

    Highlighted below is the conflicting part that is coming from the master branch:

    blue
    <<<<<< HEAD
    black
    =======
    green
    >>>>>> fix1
    red

    This is the conflicting part that is coming from the fix1 branch:

    blue
    <<<<<< HEAD
    black
    =======
    green
    >>>>>> fix1
    red

    5. Resolve the conflict by editing the file. Let us assume you want to keep both lines in the merged version. You can modify the file to be like this:

    COLORS
    ------
    blue
    black
    green
    red
    white

    6. Stage the changes, and commit.

    3. Merge the PR by clicking on the Merge pull request button, followed by the Confirm merge button. You should see a Pull request successfully merged and closed message after the PR is merged.

    • You can choose between three merging options by clicking on the down-arrow in the Merge pull request button. If you are new to Git and GitHub, the Create merge commit options are recommended.

    Next, sync your local repos (and forks). Merging a PR simply merges the code in the upstream remote repository in which it was merged. The PR author (and other members of the repo) needs to pull the merged code from the upstream repo to their local repos and push the new code to their respective forks to sync the fork with the upstream repo.

    • Step 4 Everyone sync their local repo and the fork with the team repo (see the last paragraph in the panel above)

    Follow up notes for the item(s) above:

    The workflow you followed above is very safe but has a high-overhead. You may simplify your workflow (at your own risk) after following the above workflow for a while.