repl.it linkrepl.it link (duplicated)Individual Project (iP):
Team Project (tP):
Week 9 [Fri, Oct 9th] - Topics
Detailed Table of Contents
- [W9.1] Class Diagrams: Intermediate-Level
- [W9.1a] Design → Modelling → Modelling Structure → Class diagrams - intermediate
- [W9.2] Logging
- [W9.3] Assertions
- [W9.4] Design Principles
Abstraction
- [W9.4a] Design → Design Fundamentals → Abstraction → What
Coupling
-
[W9.4b] Design → Design Fundamentals → Coupling → What
-
[W9.4c] Design → Design Fundamentals → Coupling → How
-
[W9.4d] Design → Design Fundamentals → Coupling → Types of coupling : OPTIONAL
Cohesion
-
[W9.4e] Design → Design Fundamentals → Cohesion → What
-
[W9.4f] Design → Design Fundamentals → Cohesion → How
Some Principles
- [W9.5] Testing: Intermediate Techniques
Guidance for the item(s) below:
This week, let us learn the remaining class diagram notations.
Design → Modelling → Modelling Structure → Class diagrams - intermediate
Design → Modeling → Class Diagrams (Basic)
Can use intermediate-level class diagrams
A class diagram can also show different types of relationships between classes: inheritance, compositions, aggregations, dependencies.
Modeling inheritance
OOP → Inheritance → What OOP/Inheritance UML → Class Diagrams → Inheritance → What UML/Inheritance
Modeling composition
OOP → Associations → Composition OOP/Composition UML → Class Diagrams → Composition → What UML/Composition
Modeling aggregation
OOP → Associations → Aggregation OOP/Aggregation UML → Class Diagrams → Aggregation → What UML/Aggregation
Modeling dependencies
OOP → Associations → Dependencies OOP/Dependencies UML → Class Diagrams → Dependencies → What UML/Dependencies
A class diagram can also show different types of class-like entities:
Modeling enumerations
OOP → Classes → Enumerations OOP/Enumerations UML → Class Diagrams → Enumerations → What UML/Enumerations
Modeling abstract classes
OOP → Inheritance → Abstract Classes OOP/AbstractClasses UML → Class Diagrams → Abstract Classes → What UML/AbstractClasses
Modeling interfaces
OOP → Inheritance → Interfaces OOP/Interfaces UML → Class Diagrams → Interfaces → What UML/Interfaces
Exercises
Statements about class diagram
Which of these statements match the class diagram?
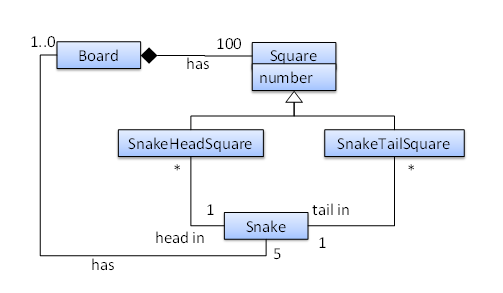
- a. A
Snakemust belong to at least oneBoard. - b. A
SnakeHeadSquarecan contain only oneSnakehead. - c. A
Squarecan contain aSnakehead. - d. A
Snakehead can be in more than oneSnakeHeadSquare. - e. The
Boardhas exactly 5Snakes.
(a)(b)(c)(d)(e)
Explanation:
(a) does not match because a Snake may or may not belong to a Board (multiplicity is 0..1)
(b) matches the diagram because the multiplicity given is 1
(c) matches the diagram because SnakeHeadSquare is a Square (due to inheritance)
(d) matches the diagram because the multiplicity given is *
(e) matches the diagram because the multiplicity given is 5
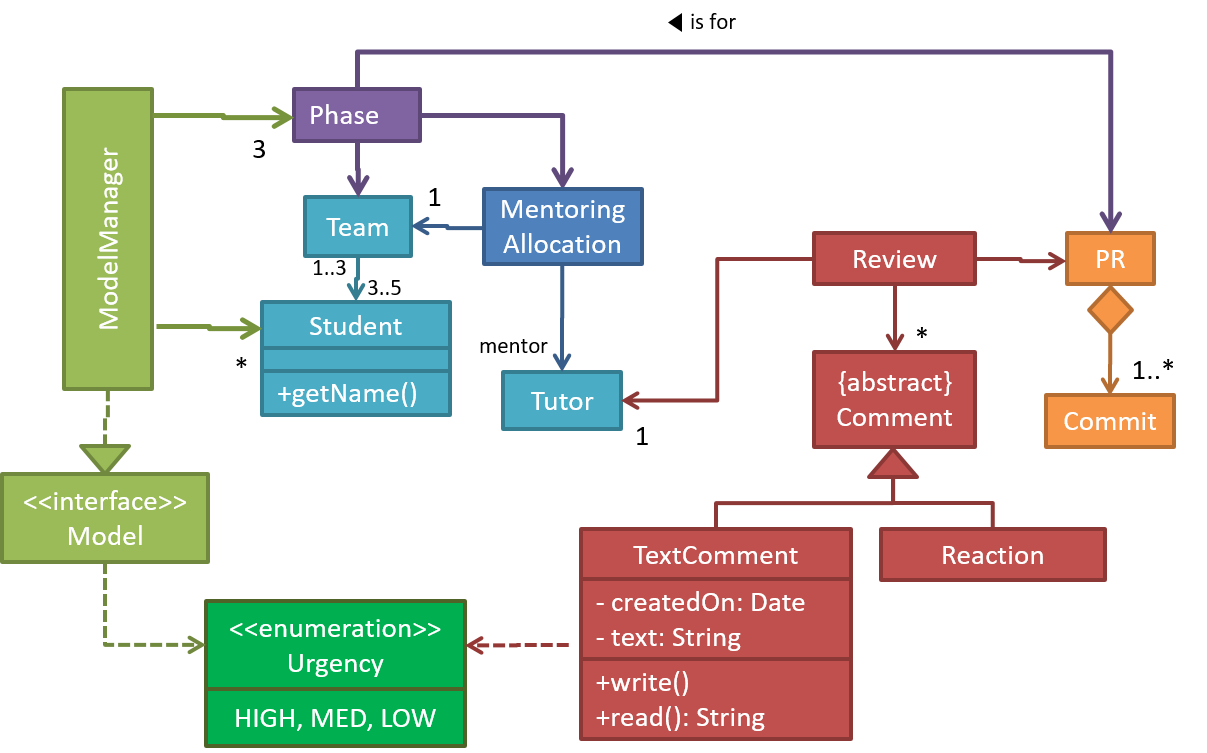
Explain notations in the class diagram
Explain the meaning of various class diagram notations in the following class diagram:
Draw a Class Diagram for the code (StockItem, Inventory, Review, etc.)
Consider the code below:
public interface Billable {
    void bill();
}
public abstract class Item
         implements Billable {
    public abstract void print();
}
public class StockItem extends Item {
    private Review review;
    private String name;

    public StockItem(
        String name, Rating rating) {

        this.name = name;
        this.review = new Review(rating);
    }

    @Override
    public void print() {
        //...
    }

    @Override
    public void bill() {
        //...
    }
}
public enum Rating {
    GOOD, OK, POOR
}
public class Review {
    private final Rating rating;

    public Review(Rating rating) {
        this.rating = rating;
    }
}
import java.util.List;

public class Inventory {
    private List<Item> items;

    public int getItemCount() {
        return items.size();
    }

    public void generateBill(Billable b) {
        // ...
    }

    public void add(Item s) {
        items.add(s);
    }
}
(a) Draw a class diagram to represent the code. Show all attributes, methods, associations, navigabilities, visibilities, known multiplicities, and association roles. Show associations as lines.
(b) Draw an object diagram to represent the situation where the inventory has one item named spanner and a review of POOR rating
i.e., new Inventory().add(new StockItem("spanner", new Review(Rating.POOR))).
Guidance for the item(s) below:
Given next are two techniques that help you locate problems in the code: logging, and assertions
Implementation → Error Handling → Logging → What
Can explain logging
Logging is the deliberate recording of certain information during a program execution for future reference. Logs are typically written to a log file but it is also possible to log information in other ways e.g. into a database or a remote server.
Logging can be useful for troubleshooting problems. A good logging system records some system information regularly. When bad things happen to a system e.g. an unanticipated failure, their associated log files may provide indications of what went wrong and actions can then be taken to prevent it from happening again.
A log file is like the flight data recorderblack box of an airplane; they don't prevent problems but they can be helpful in understanding what went wrong after the fact.

source: https://commons.wikimedia.org
Exercises
Logging vs blackbox
Why is logging like having the 'black box' in an airplane?
(a)
Implementation → Error Handling → Logging → How
Can use logging
Most programming environments come with logging systems that allow sophisticated forms of logging. They have features such as the ability to enable and disable logging easily or to change the logging how much information to recordintensity.
This sample Java code uses Java’s default logging mechanism.
First, import the relevant Java package:
import java.util.logging.*;
Next, create a Logger:
private static Logger logger = Logger.getLogger("Foo");
Now, you can use the Logger object to log information. Note the use of a INFO, WARNING etc.logging level for each message. When running the code, the logging level can be set to WARNING so that log messages specified as having INFO level (which is a lower level than WARNING) will not be written to the log file at all.
// log a message at INFO level
logger.log(Level.INFO, "going to start processing");
// ...
processInput();
if (error) {
    // log a message at WARNING level
    logger.log(Level.WARNING, "processing error", ex);
}
// ...
logger.log(Level.INFO, "end of processing");
Resources
Tutorials:
- Java Logging API - Tutorial -- A tutorial by Lars Vogella
- Java Logging Tutorial -- An alternative tutorial by Jakob Jenkov
- A video tutorial by SimplyCoded:
Best Practices:
- 10 Tips for Proper Application Logging -- by Tomasz Nurkiewicz
- What each logging level means -- conventions recommended by Apache Project
Implementation → Error Handling → Assertions → What
Can explain assertions
Assertions are used to define assumptions about the program state so that the runtime can verify them. An assertion failure indicates a possible bug in the code because the code has resulted in a program state that violates an assumption about how the code should behave.
An assertion can be used to express something like when the execution comes to this point, the variable v cannot be null.
If the runtime detects an assertion failure, it typically takes some drastic action such as terminating the execution with an error message. This is because an assertion failure indicates a possible bug and the sooner the execution stops, the safer it is.
In the Java code below, suppose you set an assertion that timeout returned by Config.getTimeout() is greater than 0. Now, if Config.getTimeout() returns -1 in a specific execution of this line, the runtime can detect it as an assertion failure -- i.e. an assumption about the expected behavior of the code turned out to be wrong which could potentially be the result of a bug -- and take some drastic action such as terminating the execution.
int timeout = Config.getTimeout();
Implementation → Error Handling → Assertions → How
Can use assertions
Use the assert keyword to define assertions.
This assertion will fail with the message x should be 0 if x is not 0 at this point.
x = getX();
assert x == 0 : "x should be 0";
...
Assertions can be disabled without modifying the code.
java -enableassertions HelloWorld (or java -ea HelloWorld) will run HelloWorld with assertions enabled while java -disableassertions HelloWorld will run it without verifying assertions.
Java disables assertions by default. This could create a situation where you think all assertions are being verified as true while in fact they are not being verified at all. Therefore, remember to enable assertions when you run the program if you want them to be in effect.
Enable assertions in Intellij (how?) and get an assertion to fail temporarily (e.g. insert an assert false into the code temporarily) to confirm assertions are being verified.
Java assert vs JUnit assertions: They are similar in purpose but JUnit assertions are more powerful and customized for testing. In addition, JUnit assertions are not disabled by default. We recommend you use JUnit assertions in test code and Java assert in functional code.
Resources
Tutorials:
- Java Assertions -- a simple tutorial from javatpoint.com
- Programming with Assertions (first half) -- a more detailed tutorial from Oracle
Best practices:
- Programming with Assertions (second half) -- from Oracle (also listed above as a tutorial) contains some best practices towards the end of the article.
Implementation → Error Handling → Assertions → When
Can use assertions optimally
It is recommended that assertions be used liberally in the code. Their impact on performance is considered low and worth the additional safety they provide.
Do not use assertions to do work because assertions can be disabled. If not, your program will stop working when assertions are not enabled.
The code below will not invoke the writeFile() method when assertions are disabled. If that method is performing some work that is necessary for your program, your program will not work correctly when assertions are disabled.
...
assert writeFile() : "File writing is supposed to return true";
Assertions are suitable for verifying assumptions about Internal Invariants, Control-Flow Invariants, Preconditions, Postconditions, and Class Invariants. Refer to [Programming with Assertions (second half)] to learn more.
Exceptions and assertions are two complementary ways of handling errors in software but they serve different purposes. Therefore, both assertions and exceptions should be used in code.
- The raising of an exception indicates an unusual condition created by the user (e.g. user inputs an unacceptable input) or the environment (e.g., a file needed for the program is missing).
- An assertion failure indicates the programmer made a mistake in the code (e.g., a null value is returned from a method that is not supposed to return null under any circumstances).
Exercises
Assertion failure in Calculator
A Calculator program crashes with an ‘assertion failure’ message when you try to find the square root of a negative number.
(c)
Explanation: An assertion failure indicates a bug in the code. (b) is not acceptable because of the word "terminated". The application should not fail at all for this input. But it could have used an exception to handle the situation internally.
Statement about exceptions and assertions
Which statements are correct?
- a. Use assertions to indicate that the programmer messed up; use exceptions to indicate that the user or the environment messed up.
- b. Use exceptions to indicate that the programmer messed up; use assertions to indicate that the user or the environment messed up.
(a)
Guidance for the item(s) below:
As you are still in the early stage of the project, this is a good time to learn some design principles that you can try to apply in the internal design of your product.
These principles build on top of the design fundamentals you learned earlier (i.e., abstraction, coupling, cohesion).
Abstraction
Guidance for the item(s) below:
Let's start by learning the three most fundamental design qualities upon which all other design principles are built.
Design → Design Fundamentals → Abstraction → What
Can explain abstraction
Abstraction is a technique for dealing with complexity. It works by establishing a level of complexity we are interested in, and suppressing the more complex details below that level.
The guiding principle of abstraction is that only details that are relevant to the current perspective or the task at hand need to be considered. As most programs are written to solve complex problems involving large amounts of intricate details, it is impossible to deal with all these details at the same time. That is where abstraction can help.
Data abstraction: abstracting away the lower level data items and thinking in terms of bigger entities
Within a certain software component, you might deal with a user data type, while ignoring the details contained in the user data item such as name, and date of birth. These details have been ‘abstracted away’ as they do not affect the task of that software component.
Control abstraction: abstracting away details of the actual control flow to focus on tasks at a higher level
print(“Hello”) is an abstraction of the actual output mechanism within the computer.
Abstraction can be applied repeatedly to obtain progressively higher levels of abstraction.
An example of different levels of data abstraction: a File is a data item that is at a higher level than an array and an array is at a higher level than a bit.
An example of different levels of control abstraction: execute(Game) is at a higher level than print(Char) which is at a higher level than an Assembly language instruction MOV.
Abstraction is a general concept that is not limited to just data or control abstractions.
Some more general examples of abstraction:
- An OOP class is an abstraction over related data and behaviors.
- An architecture is a higher-level abstraction of the design of a software.
- Models (e.g., UML models) are abstractions of some aspect of reality.
Coupling
Design → Design Fundamentals → Coupling → What
Can explain coupling
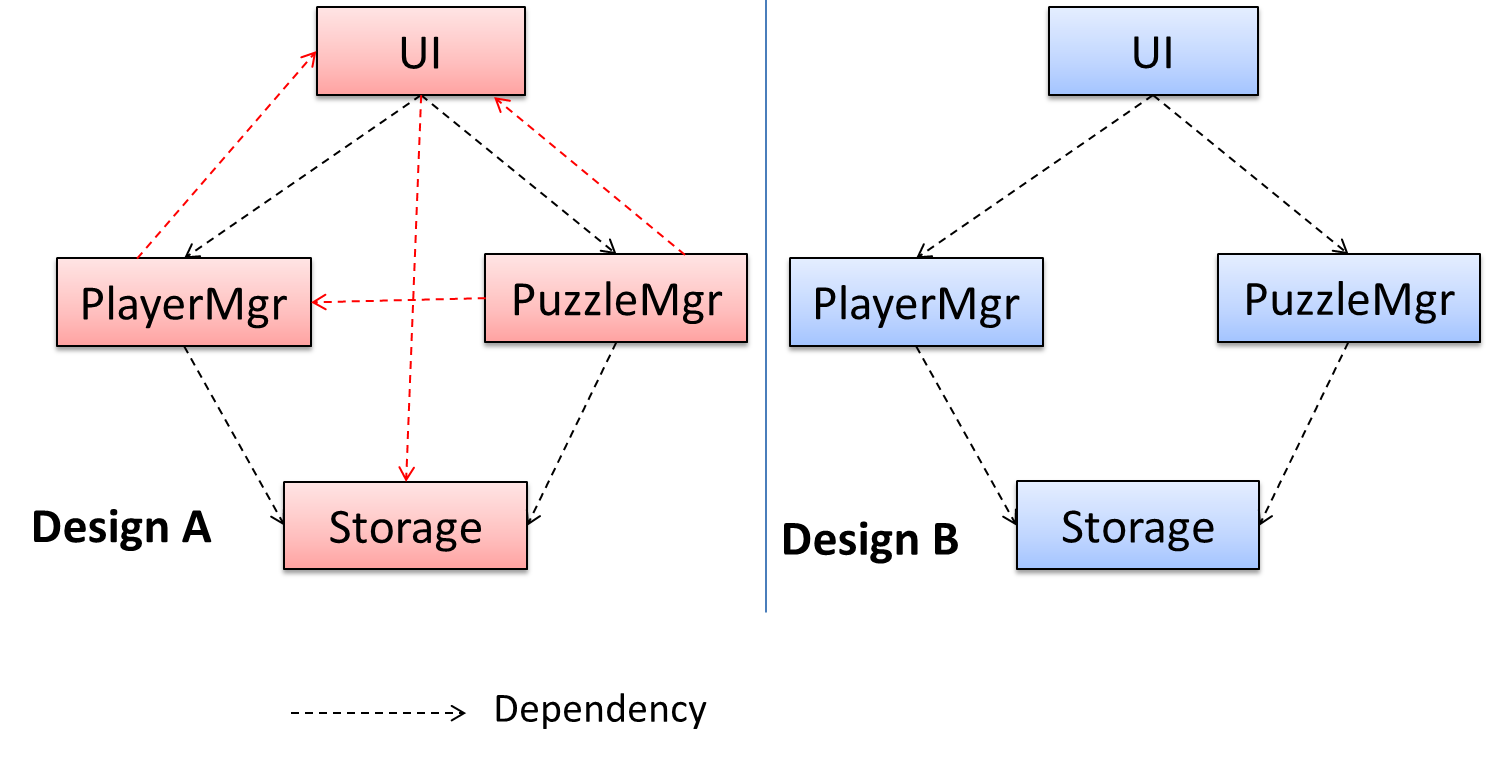
Coupling is a measure of the degree of dependence between components, classes, methods, etc. Low coupling indicates that a component is less dependent on other components. High coupling (aka tight coupling or strong coupling) is discouraged due to the following disadvantages:
- Maintenance is harder because a change in one module could cause changes in other modules coupled to it (i.e. a ripple effect).
- Integration is harder because multiple components coupled with each other have to be integrated at the same time.
- Testing and reuse of the module is harder due to its dependence on other modules.
In the example below, design A appears to have more coupling between the components than design B.
Exercises
Coupling levels of alternative designs
Discuss the coupling levels of alternative designs x and y.
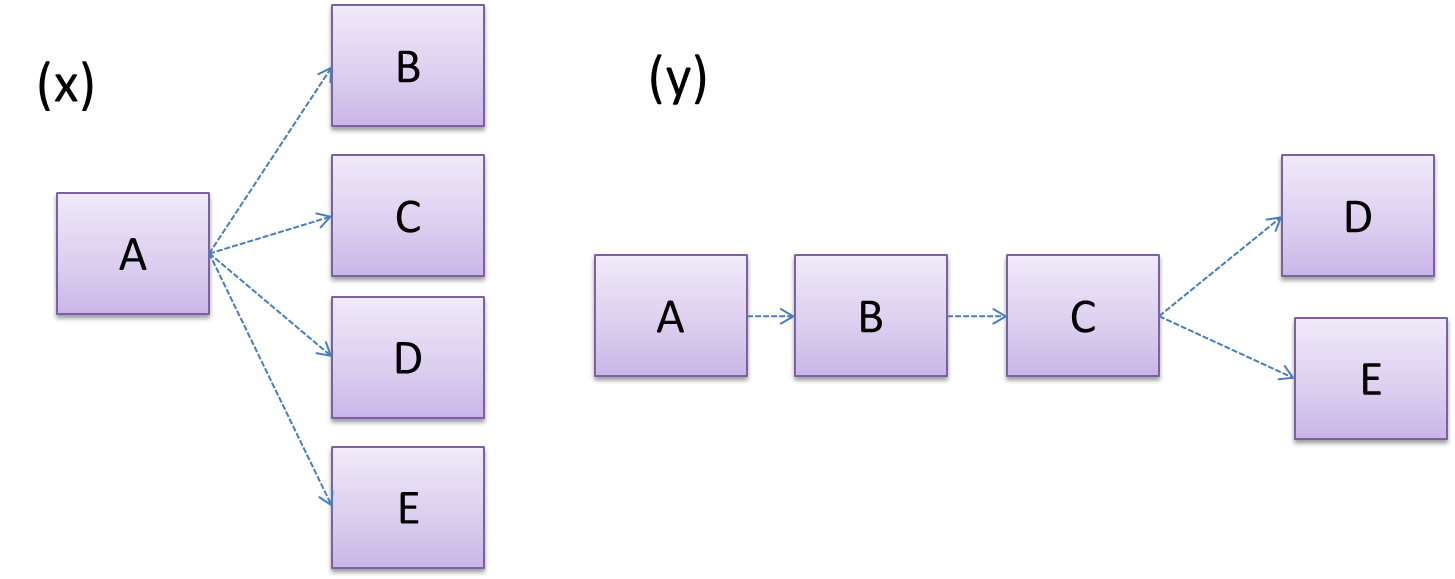
Overall coupling levels in x and y seem to be similar (neither has more dependencies than the other). (Note that the number of dependency links is not a definitive measure of the level of coupling. Some links may be stronger than the others.). However, in x, A is highly-coupled to the rest of the system while B, C, D, and E are standalone (do not depend on anything else). In y, no component is as highly-coupled as A of x. However, only D and E are standalone.
Regressions and coupling
Explain the link (if any) between regressions and coupling.
When the system is highly-coupled, the risk of regressions is higher too e.g. when component A is modified, all components ‘coupled’ to component A risk ‘unintended behavioral changes’.
Coupling and testability
Discuss the relationship between coupling and a measure of how easily a given component can be testedtestability.
Coupling decreases testability because if the Software Under TestSUT is coupled to many other components, it becomes difficult to test the SUT in isolation of its dependencies.
Statements about coupling
Choose the correct statements.
- a. As coupling increases, testability decreases.
- b. As coupling increases, the risk of regression increases.
- c. As coupling increases, the value of automated regression testing increases.
- d. As coupling increases, integration becomes easier as everything is connected together.
- e. As coupling increases, maintainability decreases.
(a)(b)(c)(d)(e)
Explanation: High coupling means either more components are required to be integrated at once in a big-bang fashion (increasing the risk of things going wrong) or more drivers and stubs are required when integrating incrementally.
Design → Design Fundamentals → Coupling → How
Design → Design Fundamentals → Coupling → What
Can reduce coupling
X is coupled to Y if a change to Y can potentially require a change in X.
If the Foo class calls the method Bar#read(), Foo is coupled to Bar because a change to Bar can potentially (but not always) require a change in the Foo class e.g. if the signature of Bar#read() is changed, Foo needs to change as well, but a change to the Bar#write() method may not require a change in the Foo class because Foo does not call Bar#write().
code for the above example
class Foo {
    ...
    new Bar().read();
    ...
}

class Bar {
    void read() {
        ...
    }

    void write() {
        ...
    }
}
Some examples of coupling: A is coupled to B if,
Ahas access to the internal structure ofB(this results in a very high level of coupling)AandBdepend on the same global variableAcallsBAreceives an object ofBas a parameter or a return valueAinherits fromBAandBare required to follow the same data format or communication protocol
Exercises
Which indicate coupling?
Which of these indicate coupling between components A and B?
- a. component A has access to the internal structure of component B.
- b. components A and B are written by the same developer.
- c. component A calls component B.
- d. component A receives an object of component B as a parameter.
- e. component A inherits from component B.
- f. components A and B have to follow the same data format or communication protocol.
(a)(b)(c)(d)(e)(f)
Explanation: Being written by the same developer does not imply coupling.
Design → Design Fundamentals → Coupling → Types of coupling
Design → Design Fundamentals → Coupling → What
Can identify types of coupling
Some examples of different coupling types:
- Content coupling: one module modifies or relies on the internal workings of another module e.g., accessing local data of another module
- Common/Global coupling: two modules share the same global data
- Control coupling: one module controlling the flow of another, by passing it information on what to do e.g., passing a flag
- Data coupling: one module sharing data with another module e.g. via passing parameters
- External coupling: two modules share an externally imposed convention e.g., data formats, communication protocols, device interfaces.
- Subclass coupling: a class inherits from another class. Note that a child class is coupled to the parent class but not the other way around.
- Temporal coupling: two actions are bundled together just because they happen to occur at the same time e.g. extracting a contiguous block of code as a method although the code block contains statements unrelated to each other
Cohesion
Design → Design Fundamentals → Cohesion → What
Can explain cohesion
Cohesion is a measure of how strongly-related and focused the various responsibilities of a component are. A highly-cohesive component keeps related functionalities together while keeping out all other unrelated things.
Higher cohesion is better. Disadvantages of low cohesion (aka weak cohesion):
- Lowers the understandability of modules as it is difficult to express module functionalities at a higher level.
- Lowers maintainability because a module can be modified due to unrelated causes (reason: the module contains code unrelated to each other) or many modules may need to be modified to achieve a small change in behavior (reason: because the code related to that change is not localized to a single module).
- Lowers reusability of modules because they do not represent logical units of functionality.
Design → Design Fundamentals → Cohesion → How
Design → Design Fundamentals → Cohesion →
What
Can increase cohesion
Cohesion can be present in many forms. Some examples:
- Code related to a single concept is kept together, e.g. the
Studentcomponent handles everything related to students. - Code that is invoked close together in time is kept together, e.g. all code related to initializing the system is kept together.
- Code that manipulates the same data structure is kept together, e.g. the
GameArchivecomponent handles everything related to the storage and retrieval of game sessions.
Suppose a Payroll application contains a class that deals with writing data to the database. If the class includes some code to show an error dialog to the user if the database is unreachable, that class is not cohesive because it seems to be interacting with the user as well as the database.
Exercises
Which class is more cohesive?
Compare the cohesion of the following two versions of the EmailMessage class. Which one is more cohesive and why?
// version-1
class EmailMessage {
    private String sendTo;
    private String subject;
    private String message;

    public EmailMessage(String sendTo, String subject, String message) {
        this.sendTo = sendTo;
        this.subject = subject;
        this.message = message;
    }

    public void sendMessage() {
        // sends message using sendTo, subject and message
    }
}

// version-2
class EmailMessage {
    private String sendTo;
    private String subject;
    private String message;
    private String username;

    public EmailMessage(String sendTo, String subject, String message) {
        this.sendTo = sendTo;
        this.subject = subject;
        this.message = message;
    }

    public void sendMessage() {
        // sends message using sendTo, subject and message
    }

    public void login(String username, String password) {
        this.username = username;
        // code to login
    }
}
Version 2 is less cohesive.
Explanation: Version 2 is handling functionality related to login, which is not directly related to the concept of ‘email message’ that the class is supposed to represent. On a related note, you can improve the cohesion of both versions by removing the sendMessage functionality. Although sending messages is related to emails, this class is supposed to represent an email message, not an email server.
Guidance for the item(s) below:
Given next are two design principles that we can apply when designing OOP systems. These aim to improve abstraction, coupling, cohesionthe three design qualities you learned earlier.
Some Principles
Principles → Single responsibility principle
Can explain single responsibility principle
Single responsibility principle (SRP): A class should have one, and only one, reason to change. -- Robert C. Martin
If a class has only one responsibility, it needs to change only when there is a change to that responsibility.
Consider a TextUi class that does parsing of the user commands as well as interacting with the user. That class needs to change when the formatting of the UI changes as well as when the syntax of the user command changes. Hence, such a class does not follow the SRP.
Gather together the things that change for the same reasons. Separate those things that change for different reasons. ―- Agile Software Development, Principles, Patterns, and Practices by Robert C. Martin
Resources
- An explanation of the SRP from www.oodesign.com
- Another explanation (more detailed) by Patkos Csaba
- A book chapter on SRP written by the father of the principle itself, Robert C Martin
Principles → Separation of concerns principle
Can explain separation of concerns principle
Separation of concerns principle (SoC): To achieve better modularity, separate the code into distinct sections, such that each section addresses a separate concern. -- Proposed by Edsger W. Dijkstra
A concern in this context is a set of information that affects the code of a computer program.
Examples for concerns:
- A specific feature, such as the code related to the
add employeefeature - A specific aspect, such as the code related to
persistenceorsecurity - A specific entity, such as the code related to the
Employeeentity
Applying Separation of ConcernsSoC reduces functional overlaps among code sections and also limits the ripple effect when changes are introduced to a specific part of the system.
If the code related to persistence is separated from the code related to security, a change to how the data are persisted will not need changes to how the security is implemented.
This principle can be applied at the class level, as well as at higher levels.
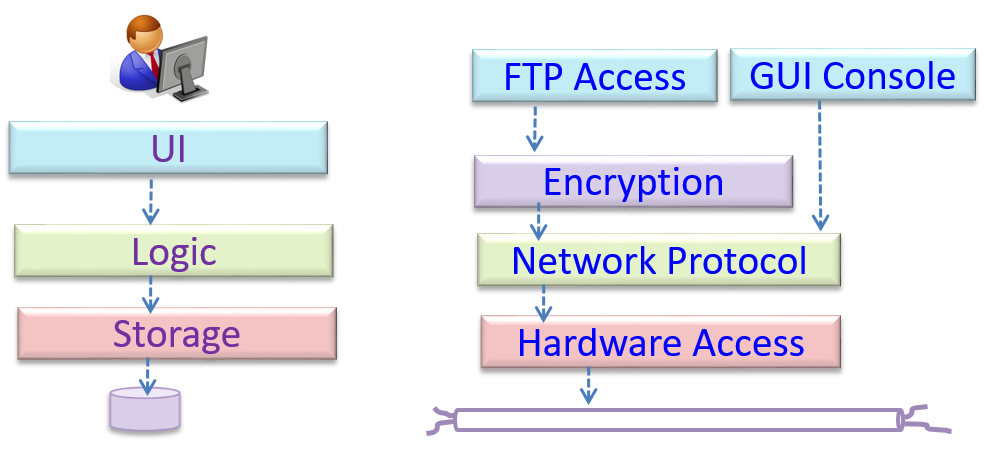
The n-tier architecture utilizes this principle. Each layer in the architecture has a well-defined functionality that has no functional overlap with each other.
Can identify n-tier architectural style
In the n-tier style, higher layers make use of services provided by lower layers. Lower layers are independent of higher layers. Other names: multi-layered, layered.
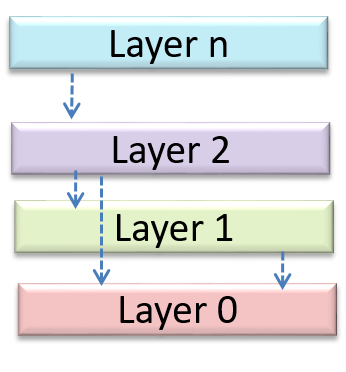
Operating systems and network communication software often use n-tier style.
This principle should lead to higher cohesion and lower coupling.
Can explain coupling
Coupling is a measure of the degree of dependence between components, classes, methods, etc. Low coupling indicates that a component is less dependent on other components. High coupling (aka tight coupling or strong coupling) is discouraged due to the following disadvantages:
- Maintenance is harder because a change in one module could cause changes in other modules coupled to it (i.e. a ripple effect).
- Integration is harder because multiple components coupled with each other have to be integrated at the same time.
- Testing and reuse of the module is harder due to its dependence on other modules.
In the example below, design A appears to have more coupling between the components than design B.
Exercises
Coupling levels of alternative designs
Discuss the coupling levels of alternative designs x and y.
Overall coupling levels in x and y seem to be similar (neither has more dependencies than the other). (Note that the number of dependency links is not a definitive measure of the level of coupling. Some links may be stronger than the others.). However, in x, A is highly-coupled to the rest of the system while B, C, D, and E are standalone (do not depend on anything else). In y, no component is as highly-coupled as A of x. However, only D and E are standalone.
Regressions and coupling
Explain the link (if any) between regressions and coupling.
When the system is highly-coupled, the risk of regressions is higher too e.g. when component A is modified, all components ‘coupled’ to component A risk ‘unintended behavioral changes’.
Coupling and testability
Discuss the relationship between coupling and a measure of how easily a given component can be testedtestability.
Coupling decreases testability because if the Software Under TestSUT is coupled to many other components, it becomes difficult to test the SUT in isolation of its dependencies.
Statements about coupling
Choose the correct statements.
- a. As coupling increases, testability decreases.
- b. As coupling increases, the risk of regression increases.
- c. As coupling increases, the value of automated regression testing increases.
- d. As coupling increases, integration becomes easier as everything is connected together.
- e. As coupling increases, maintainability decreases.
(a)(b)(c)(d)(e)
Explanation: High coupling means either more components are required to be integrated at once in a big-bang fashion (increasing the risk of things going wrong) or more drivers and stubs are required when integrating incrementally.
Can explain cohesion
Cohesion is a measure of how strongly-related and focused the various responsibilities of a component are. A highly-cohesive component keeps related functionalities together while keeping out all other unrelated things.
Higher cohesion is better. Disadvantages of low cohesion (aka weak cohesion):
- Lowers the understandability of modules as it is difficult to express module functionalities at a higher level.
- Lowers maintainability because a module can be modified due to unrelated causes (reason: the module contains code unrelated to each other) or many modules may need to be modified to achieve a small change in behavior (reason: because the code related to that change is not localized to a single module).
- Lowers reusability of modules because they do not represent logical units of functionality.
Exercises
Correct statements about SoC
“Only the GUI class should interact with the user. The GUI class should only concern itself with user interactions”. This statement follows from,
- a. A software design should promote separation of concerns in a design.
- b. A software design should increase cohesion of its components.
- c. A software design should follow single responsibility principle.
(a)(b)(c)
Explanation: By making ‘user interaction’ the GUI class’s sole responsibility, we increase its cohesion. This is also in line with the separation of concerns (i.e., we separated the concern of user interaction) and the single responsibility principle (the GUI class has only one responsibility).
Follow up notes for the item(s) above:
As you may have realized already, the two principles given above are somewhat similar, one is specific to OOP and applied at class level while the other is not specific to OOP and can be applied at any level.
To learn more principles, you can go to https://se-education.org/se-book/principles/.
Guidance for the item(s) below:
We started writing JUnit testing in the last week. The topics below helps you push a bit further in the same direction.
Quality Assurance → Testing → Introduction → Testability
Can explain testability
Testability is an indication of how easy it is to test an SUT. As testability depends a lot on the design and implementation, you should try to increase the testability when you design and implement software. The higher the testability, the easier it is to achieve better quality software.
C++ to Java → JUnit → JUnit: Intermediate
Can use intermediate features of JUnit
Skim through the JUnit 5 User Guide to see what advanced techniques are available. If applicable, feel free to adopt them.
Quality Assurance → Testing → Test-Driven Development → What
Can explain TDD
Test-Driven Development(TDD) advocates writing the tests before writing the SUT, while evolving functionality and tests in small increments. In TDD you first define the precise behavior of the SUT using test cases, and then write the SUT to match the specified behavior. While TDD has its fair share of detractors, there are many who consider it a good way to reduce defects. One big advantage of TDD is that it guarantees the code is testable.
Exercises
When do we write tests in TDD?
A) In TDD, we write all the test cases before we start writing functional code.
B) Testing tools such as JUnit require us to follow TDD.
A) False
Explanation: No, not all. We proceed in small steps, writing tests and functional code in tandem, but writing the test before we write the corresponding functional code.
B) False
Explanation: They can be used for TDD, but they can be used without TDD too.